Professional development/Project management/Wrike guide
Learn to use the software
When you create an account an intro video will appear, you can watch it to start becoming familiar with Wrike.
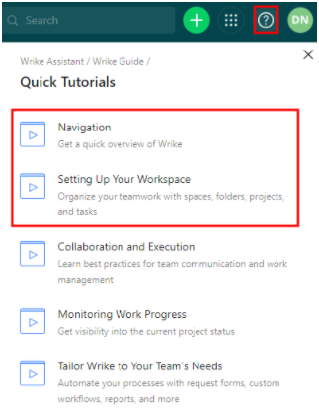
You can then click on the ? sign on the top right corner of the page. A menu will appear, choose Wrike Guide>Quick Tutorials and you can watch the first 2 videos 'Navigation' and 'Launching new projects' (previously named 'Setting up your workspace'). (as seen in the following picture)

Tips to use Wrike
Move your project
There is no very easy way within wrike to move all your tasks from one account to another however it is possible to do by exporting your data to an excel sheet and then importing the excel in the new location.
- Follow these instructions to export your project as an excel file, make sure 'All tasks' is selected.
- Follow these instructions to import the excel file you just created to your new wrike project.
- Be careful: so that wrike automatically assigns the same assignees to the tasks in the new account, all the users must have accepted the invitation to the account.
Snapshot
If you want to export and share your Wrike plan up to a certain date you can do so with 'Snapshot' in Wrike.
To create the snapshot, follow the instructions here https://help.wrike.com/hc/en-us/articles/210323545-Gantt-Chart-Snapshot. Don't forget to choose the 'Show assignee names' option when creating it and have the 'All tasks' filter enabled so the completed tasks can be referenced if necessary.
Add users
If you want to add users to your project there are a few ways of doing it. The easiest way is to invite them to the account by sharing the specific project with them so they already have access once they accept the invitation. Here are also some instructions.
- Open a space with the project you want to share.
- Click on the project you want to share.
- Click on the Share button on the top right of the page.
- Type in the email you want to share with. A drop down will appear asking to invite the user to wrike, click Invite to Wrike.
- In the new window select the type of license to give to the user (regular user).
- You can paste other emails to add them to wrike but the specific project won't be shared with them, you will still have to search them and add them to the list of users for the project.
- Finally click on Invite users.
When the users get the invite, make their account and are logged in to wrike, they will have to click Shared with me on the right side of the home page so see the project.
They can Pin the project to make it easier to access.
*If a user has access to multiple accounts, they need to make sure to be in the right one by clicking on their profile (bubble at the top right) and picking the right account.
Expired trials
If your free trial has expired and you need to navigate to the 'CEED MakerLab' account to access the plan you will use for the GNG project you can follow these steps:
(also found here https://help.wrike.com/hc/en-us/articles/360021181373-Expired-Trials)
- Click on 'See plans'.
- There is a very small option on the page to 'Downgrade to free plan'.
- Now the UI will be unblocked and you can navigate to the right workspace.
- Click on your initials at the top right corner.
- Click on change account in the drop down.
- Choose 'CEED MakerLab'.
How to make an account (for non-GNG students)
To use the premium tools in Wrike you can create a student account.
- To set up a free student account, you will need to contact the wrike support staff.
- Send an email to [support@team.wrike.com] and provide the following:
- The email you would like your account to be created with.
- The name of your school (University of Ottawa) and the school website (www.uottawa.ca).
- A picture of your student card showing the expiring date (both sides of the card). If you do not have a student card you can login to uozone, go to Applications and choose 'View Unofficial Enrollment Verification' to get an enrolment report.
- Your email can look like this : Hello, my name is John Doe and I would like to setup a student account with wrike. The email address that I want the account to be in is [jdoe001@uottawa.ca], the name of my school is University of Ottawa and their website is www.uottawa.ca. I also attached a picture of my student ID showing the expiration date.
If this is not working for you, you can get one of your teammates to add you to the wrike project as a 'Regular user' to have the same features.