Digital technologies/Soldering/Soldering- Beginner/How to Solder
Set up
To begin soldering gather all of the equipment and components necessary. And begin by determining which connection needs to be made and how you plan on making it. Next we will set up the Iron and station. Ensure you have a working soldering iron and stand, brass wool/wet sponge, solder, ventilation, and (optional) flux and tip tinner. Turn on the iron and select the appropriate temperature for the iron:
- 700F (370C) for through hole components and wires
- 600F (315C) for surface mount components
Soldering Wires

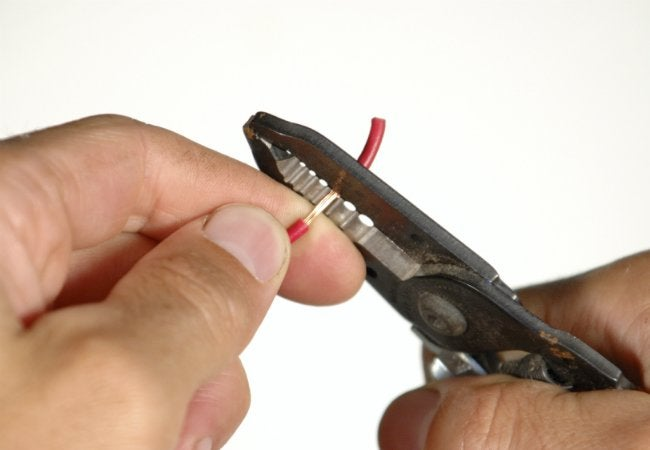
Soldering two wires is the best way to practice soldering at the very beginning. There are two types of wire, either stranded or solid core. Both have a metal core wrapped in a plastic covering. To see the metal, you need to expose the core by removing the plastic. This can be done using wire strippers or wire cutters. When using wire strippers - place the wire in the slot written to be for the wire gauge you’re using and gently press around the tubing. You want to be sure to avoid cutting through the core of the wire since the goal is to expose the core. Once the perimeter of the covering has been cut through you will then remove it by slipping it off the core as seen below.
How does the wire stripper work?
The wire stripper works by having blades that are circular in shape and of different diameters that correspond to different wire gauges. The wire cutter is designed to cut through the sheath on a wire whilst not cutting through its core.
- Grab a few wires, strip 1 cm off each end.
- Twist the two wires together with pliers or your fingers.
- Hold the soldering iron like a pen. Heat the two wires for 1-2 seconds and then flow solder on the connection. The goal is to heat the connection not the solder. Once you see the solder flow evenly throughout the connection, remove the solder and soldering iron.
- Long exposure of the iron to the PCB and other electronic components will lead to them burning so make sure you don't leave the iron there for too long.
- Allow the connection to cool, this usually takes 20-30 seconds. During this time, avoid moving the wires.
Soldering THT
- Place the lead (metal stick coming from component) or wire through the hole in the protoboard or PCB. Bend the leads slightly to the outside so the component doesn't fall through.
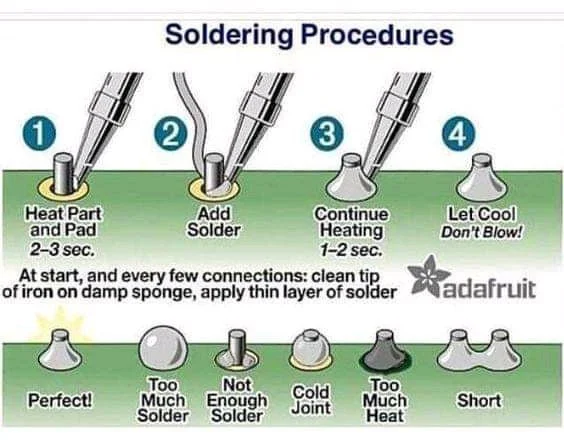
- Holding the soldering iron like a pen, heat the copper pad and lead with the soldering iron until the solder begins to flow and forms a strong connection. Remove solder, and then the soldering iron. This process should take only a few seconds.
- Long exposure of the iron to the PCB and other electronic components will lead to them burning so make sure you don't leave the iron there for too long.
- Allow for the connection to cool.
- Snip off the excess lead as close as possible to the board with wire cutters or flush cutters.
When soldering be sure that you don't use too much or too little solder - as seen below, ideally the joint should have a cone shape to it.
