Digital technologies/Laser cutting/Rotary Laser Engraving: Difference between revisions
External Tutorial Reference |
External References |
||
| Line 12: | Line 12: | ||
# The tool is now ready to be inserted into the machine. Simply line up the holes with the pins and connect the tool to the machine. | # The tool is now ready to be inserted into the machine. Simply line up the holes with the pins and connect the tool to the machine. | ||
# Once the tool is set up, put down the rulers so there are no interferences with the laser head. Now turn on the Epilog laser and the machine will automatically position itself. If your machine was already turned on, turn it off and back on again. It can only recognize the rotary engraving tool on boot up. | # Once the tool is set up, put down the rulers so there are no interferences with the laser head. Now turn on the Epilog laser and the machine will automatically position itself. If your machine was already turned on, turn it off and back on again. It can only recognize the rotary engraving tool on boot up. | ||
[[File:Rotary Tool Setup (3).png|center|770x770px|alt=|frameless]] | '''<u>**You also have to turn off the Epilog laser before uninstalling the rotary engraving attachment tool.</u>'''[[File:Rotary Tool Setup (3).png|center|770x770px|alt=|frameless]] | ||
=== Setting Up the Part === | === Setting Up the Part === | ||
| Line 45: | Line 45: | ||
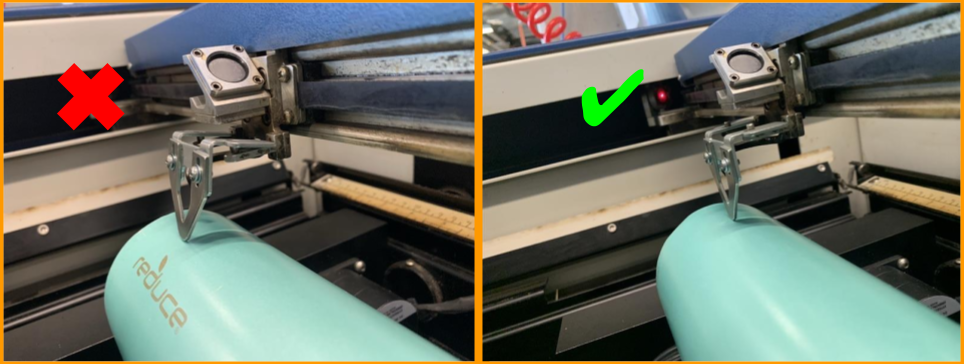
[[File:Focusing.png|left|thumb|557x557px|Focusing tool should not be sitting on the part, only barely touching.]] | [[File:Focusing.png|left|thumb|557x557px|Focusing tool should not be sitting on the part, only barely touching.]] | ||
=== Rasterizing Settings === | |||
You should base yourself off the recommended settings from your laser according to the user manual for specific materials. You can use higher<br> | |||
=== Setting Up Your File === | === Setting Up Your File === | ||
Your file setup will be the same as per usual engraving projects. The only consideration you should keep in mind is the orientation. The top part of your file will be facing the same way the machine as it is on your screen. | Your file setup will be the same as per usual engraving projects. The only consideration you should keep in mind is the orientation. The top part of your file will be facing the same way on the machine as it is on your screen. For a 360° engraving job, you will have to measure the circumference of your part and set as the height of your file. The width can we however much you want it to be as long as it fits on the part. | ||
=== External Tutorial Reference === | === External Tutorial Reference === | ||
You can watch this very instructive [https://www.youtube.com/watch?v=36kdUQXmaA0 video] by [https://www.epiloglaser.com/en-ca/ Epilog] for a visual demonstration on how to set-up and engrave with the rotary attachment. | You can watch this very instructive [https://www.youtube.com/watch?v=36kdUQXmaA0 video] by [https://www.epiloglaser.com/en-ca/ Epilog] for a visual demonstration on how to set-up and engrave with the rotary attachment. | ||
Epilog also offers a detailed [https://www.epiloglaser.com/downloads/pdf/fusion_rotary_attachment.pdf pdf instruction manual] if you have unanswered questions. | |||
Don't hesitate to ask question to our Makerspace staff! | |||
Revision as of 21:09, 7 August 2024
Sometimes you want to engrave something that isn't flat, and that's okay. The Epilog laser engraver has an attachment that can let you do such things. The tool is equipped of motorized rollers that rotates your part (i.e. a water bottle) to allow you to engrave all around it. The Makerspace of uOttawa is perfectly well equipped to do this type of engraving. In this document, we will take you through some steps and procedures to help you successfully complete your rotary engraving project.
Setting Up the Tool
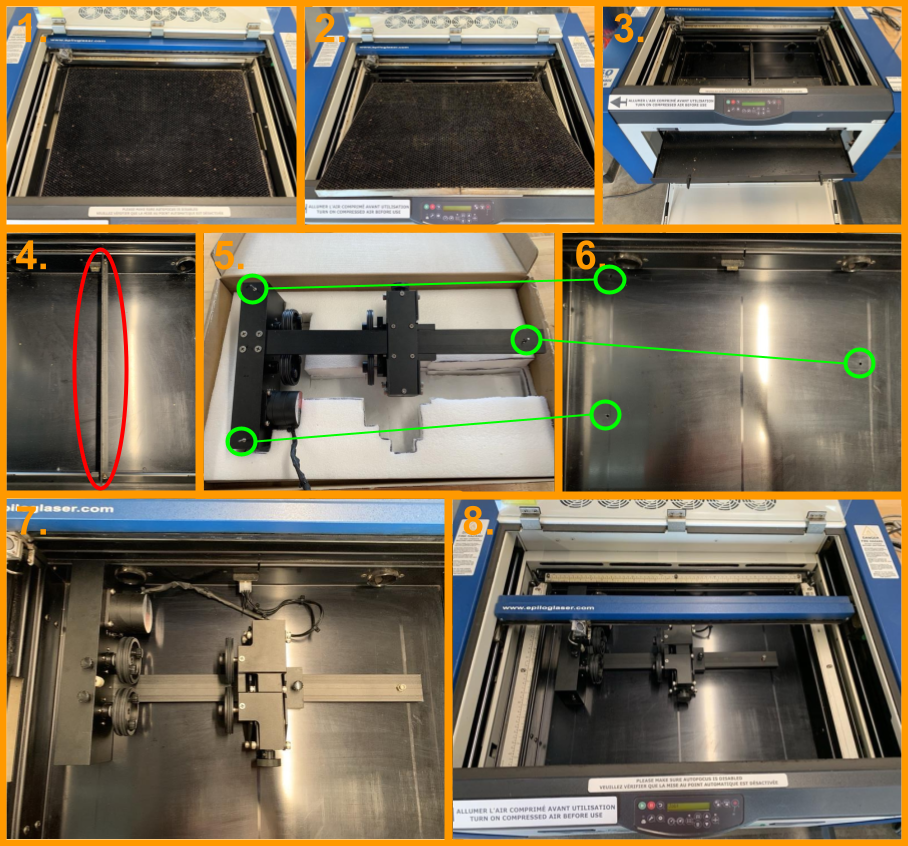
To use the rotary engraving tool, follow these simple steps.
- To do so, simply lift up all the rulers
- Lift up the bed to take it out. The bed is not heavy, if you happen to struggle to take it out, there is probably an obstruction in the way. At the Makerspace, ask a staff member to assist you if possible.
- Remove the crumb trey by opening the front magnetic door of the laser and then sliding it out.
- Remove the cross section bar.
- There are pins underneath the tool and also a plug-in connection to connect on the laser
- You should see three holes at the bottom in which the tool pins are inserted and also the connection plug-in should now be exposed.
- The tool is now ready to be inserted into the machine. Simply line up the holes with the pins and connect the tool to the machine.
- Once the tool is set up, put down the rulers so there are no interferences with the laser head. Now turn on the Epilog laser and the machine will automatically position itself. If your machine was already turned on, turn it off and back on again. It can only recognize the rotary engraving tool on boot up.
**You also have to turn off the Epilog laser before uninstalling the rotary engraving attachment tool.
Setting Up the Part
Now that you have your tool ready, the next step is to get the part to fit properly on the tool for good results.
Roller Positioning
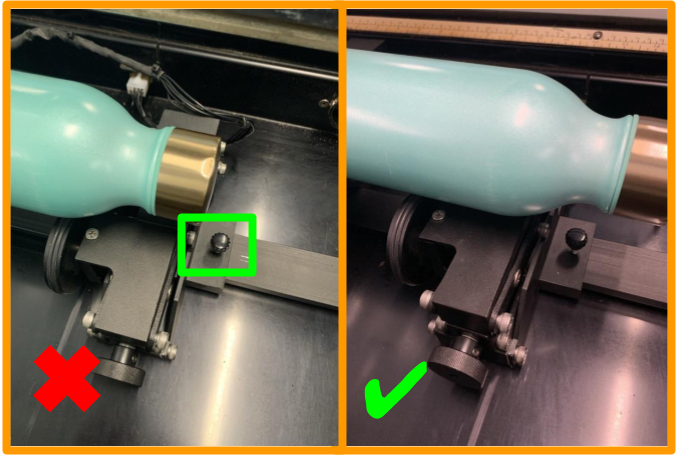
The right hand roller can be repositioned to adapt to the length of your part. You want to choose a position that optimizes a flat top surface, a smooth rolling surface, and good balance.
Top Surface Leveling
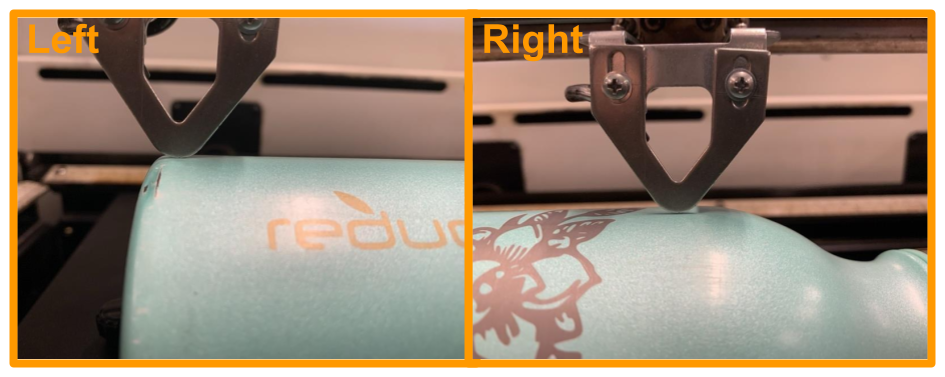
If you have a conic part, you still need to have a flat top surface. To get the perfectly flat top surface, you will have to manually level the bed to the highest point of your part, which should be the left side. Then, while keeping your focusing tool on, you can move the laser to the right hand side and adjust the roller height until the part touches the focusing tool. Go back to the left hand side to make sure your focus didn't change and you should now have a good leveling. You can repeat the steps if you are not satisfied. You can also use a bubble level to check if the top surface has the same level as the gantry.
Tubing and Light Parts
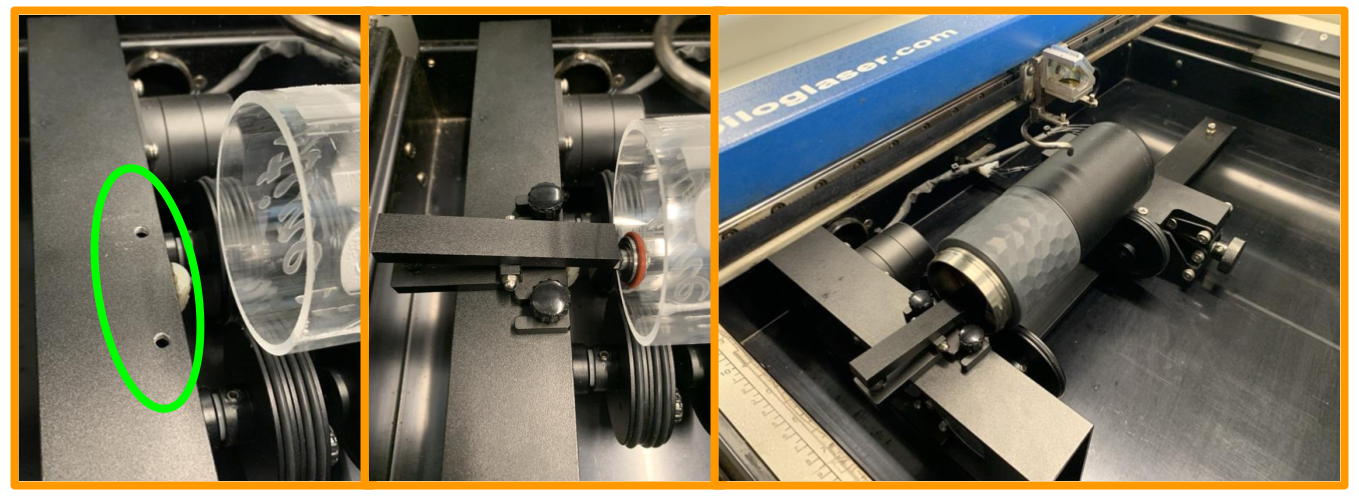
Lighter parts, such as tubes, tend to slip on the rollers due to lower friction. If possible add weight to your part (i.e. add water to a water bottle). If adding weight is not a option, you can use the attachment for tubing. It will clamp down the part onto the rollers to minimize slippage.
Part Position
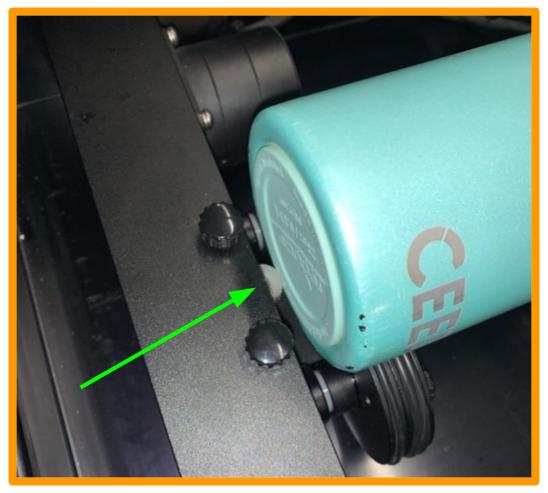
You want your part to be sitting against the plastic bumper on the left side of the tool. The rollers are made intentionally so that it pushes the part against that small plastic bumper to minimize lateral movement. Additionally, to avoid having the part moving while engraving, you want to do a Top-Down engraving. If you do a Bottom-Up engraving the part will move away that plastic bumper and warp your engraving.
Setting Home Point
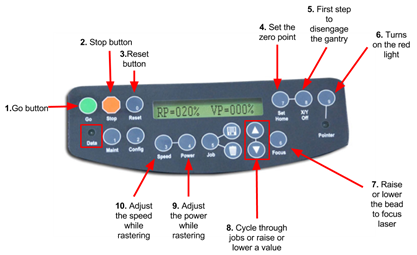
When using this tool, the Epilog laser is pre-programmed to a set y coordinate, the only coordinate you can change is the x axis home point. To set home point, use the usual button combination on the control panel of X/Y Off (5.) → Go (1.) to disengage the gantry and then Set Home (4.) when the desired location is set. It is ok if you accidentally change the y position while setting your home point, the laser will not take the change into consideration.
Focusing
Focusing the laser works the same as usual. Do not use the Auto Focus feature on the Epilog laser in the Makerspace. Doing so will cause the bed to crash into the laser head. Use the manual focus by pressing the Focus (7.) button on the control panel, then add the focus tool to the laser head and use the up and down arrows (8.) so that the tip of the focus tool barely touches your part.
Rasterizing Settings
You should base yourself off the recommended settings from your laser according to the user manual for specific materials. You can use higher
Setting Up Your File
Your file setup will be the same as per usual engraving projects. The only consideration you should keep in mind is the orientation. The top part of your file will be facing the same way on the machine as it is on your screen. For a 360° engraving job, you will have to measure the circumference of your part and set as the height of your file. The width can we however much you want it to be as long as it fits on the part.
External Tutorial Reference
You can watch this very instructive video by Epilog for a visual demonstration on how to set-up and engrave with the rotary attachment.
Epilog also offers a detailed pdf instruction manual if you have unanswered questions.
Don't hesitate to ask question to our Makerspace staff!