Digital technologies/Laser cutting/Rotary Laser Engraving: Difference between revisions
Images |
|||
| Line 1: | Line 1: | ||
Sometimes you want to engrave something that isn't flat, and that's okay. The Epilog laser engraver has an attachment that can let you do such things. The tool is equipped of motorized rollers that rotate your part (i.e. a water bottle) to allow you to engrave all around it. The Makerspace of uOttawa is perfectly well equipped to do this type of engraving. | Sometimes you want to engrave something that isn't flat, and that's okay. The Epilog laser engraver has an attachment that can let you do such things. The tool is equipped of motorized rollers that rotate your part (i.e. a water bottle) to allow you to engrave all around it. The Makerspace of uOttawa is perfectly well equipped to do this type of engraving. | ||
| Line 13: | Line 12: | ||
# The tool is now ready to be inserted into the machine. Simply line up the holes with the pins and connect the tool to the machine. | # The tool is now ready to be inserted into the machine. Simply line up the holes with the pins and connect the tool to the machine. | ||
# Once the tool is set up, put down the rulers so there are no interferences with the laser head. Now turn on the Epilog laser and the machine will automatically position itself. If your machine was already turned on, turn it off and back on again. It can only recognize the rotary engraving tool on boot up. | # Once the tool is set up, put down the rulers so there are no interferences with the laser head. Now turn on the Epilog laser and the machine will automatically position itself. If your machine was already turned on, turn it off and back on again. It can only recognize the rotary engraving tool on boot up. | ||
[[File:Rotary Tool Setup (3).png|center|770x770px|alt=|frameless]] | |||
[[File:Rotary Tool Setup (3).png|center| | |||
=== Setting Home Point === | === Setting Home Point === | ||
| Line 22: | Line 20: | ||
=== Focusing === | === Focusing === | ||
Focusing the laser works the same as usual. <u>Do not use the Auto Focus feature</u> on the Epilog laser in the Makerspace. Doing so will cause the bed to crash into the laser head. Use the manual focus by pressing the ''Focus'' <sup>(7.)</sup> button on the control panel, then add the focus tool to the laser head and use the up and down arrows <sup>(8.)</sup> so that the tip of the focus tool barely touches your part. | Focusing the laser works the same as usual. <u>Do not use the Auto Focus feature</u> on the Epilog laser in the Makerspace. Doing so will cause the bed to crash into the laser head. Use the manual focus by pressing the ''Focus'' <sup>(7.)</sup> button on the control panel, then add the focus tool to the laser head and use the up and down arrows <sup>(8.)</sup> so that the tip of the focus tool barely touches your part. | ||
[[File:Focusing.png|left|thumb|557x557px|Focusing tool should not be sitting on the part, only barely touching.]] | |||
Revision as of 19:13, 31 July 2024
Sometimes you want to engrave something that isn't flat, and that's okay. The Epilog laser engraver has an attachment that can let you do such things. The tool is equipped of motorized rollers that rotate your part (i.e. a water bottle) to allow you to engrave all around it. The Makerspace of uOttawa is perfectly well equipped to do this type of engraving.
Setting Up the Tool
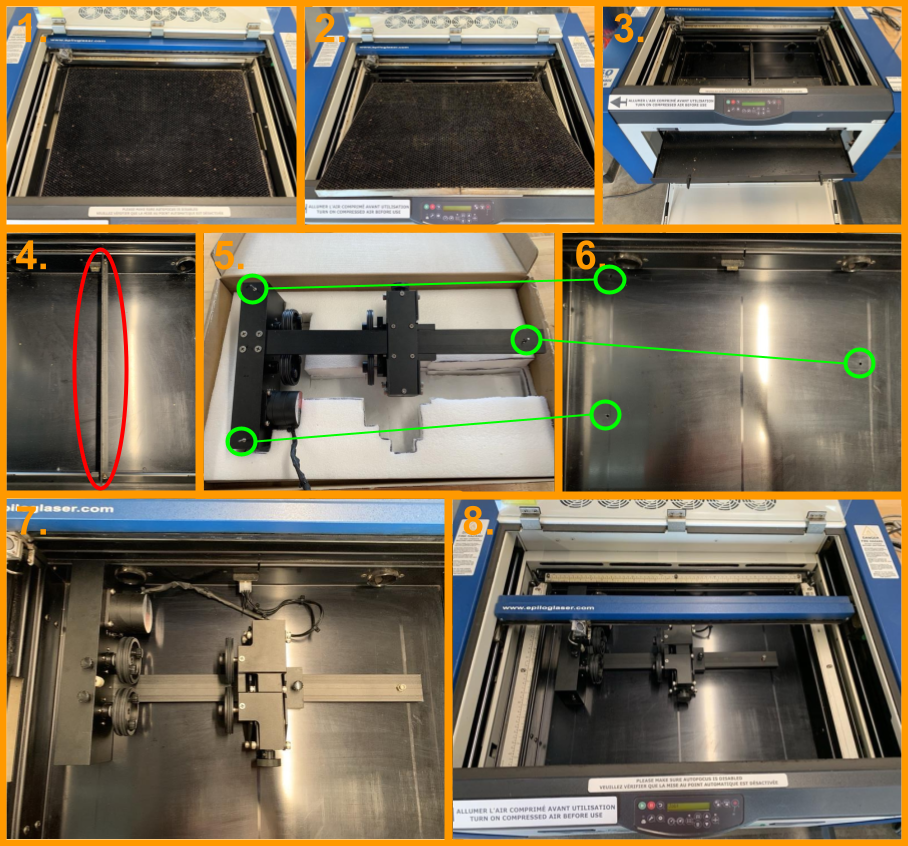
To use the rotary engraving tool, follow these simple steps.
- To do so, simply lift up all the rulers
- Lift up the bed to take it out. The bed is not heavy, if you happen to struggle to take it out, there is probably an obstruction in the way. At the Makerspace, ask a staff member to assist you if possible.
- Remove the crumb trey by opening the front magnetic door of the laser and then sliding it out.
- Remove the cross section bar.
- There are pins underneath the tool and also a plug-in connection to connect on the laser
- You should see three holes at the bottom in which the tool pins are inserted and also the connection plug-in should now be exposed.
- The tool is now ready to be inserted into the machine. Simply line up the holes with the pins and connect the tool to the machine.
- Once the tool is set up, put down the rulers so there are no interferences with the laser head. Now turn on the Epilog laser and the machine will automatically position itself. If your machine was already turned on, turn it off and back on again. It can only recognize the rotary engraving tool on boot up.

Setting Home Point

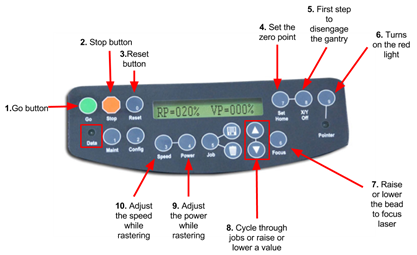
When using this tool, the Epilog laser is pre-programmed to a set y coordinate, the only coordinate you can change is the x axis home point. To set home point, use the usual button combination on the control panel of X/Y Off (5.) → Go (1.) to disengage the gantry and then Set Home (4.) when the desired location is set. It is ok if you accidentally change the y position while setting your home point, the laser will not take the change into consideration.
Focusing
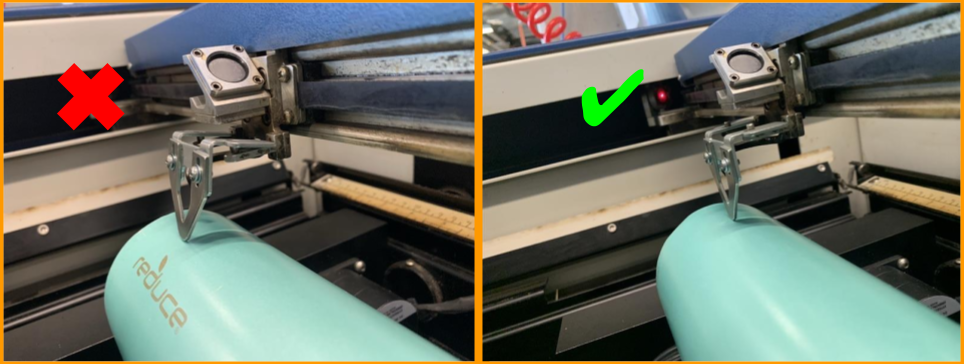
Focusing the laser works the same as usual. Do not use the Auto Focus feature on the Epilog laser in the Makerspace. Doing so will cause the bed to crash into the laser head. Use the manual focus by pressing the Focus (7.) button on the control panel, then add the focus tool to the laser head and use the up and down arrows (8.) so that the tip of the focus tool barely touches your part.
