Digital technologies/3D printing/Tutorial: How to 3D print: Difference between revisions
| Line 27: | Line 27: | ||
* Now you can bring your SD card to the printer and insert it in the SD card slot. You can hang the tag you were given on the hook, that is, to the left of the SD card slot. | * Now you can bring your SD card to the printer and insert it in the SD card slot. You can hang the tag you were given on the hook, that is, to the left of the SD card slot. | ||
# First, you’ll need to turn on the printer. The ON switch is found on the back of the printer, it’ll be at the bottom left corner. | # First, you’ll need to turn on the printer. The 'ON' switch is found on the back of the printer, it’ll be at the bottom left corner. | ||
# Once on, select Print, then 'yourfilename.gcode' in the printer’s user interface. The printer will take a few minutes to heat up, then will begin to print. Monitor the print job for major errors in extrusion or adhesion of the plastic. If errors do occur in the print, it can be paused or aborted, (Tune>Abort), using the printer's interface. | # Once on, select Print, then 'yourfilename.gcode' in the printer’s user interface. The printer will take a few minutes to heat up, then will begin to print. Monitor the print job for major errors in extrusion or adhesion of the plastic. If errors do occur in the print, it can be paused or aborted, (Tune>Abort), using the printer's interface. | ||
Revision as of 13:46, 20 June 2024
This tutorial covers the necessary steps to take to use the Ultimaker series 3D printers at the Makerspace.
Step-by-step 3D printing
So, you've got an STL file that you’re ready to bring to life, or perhaps you're just here to experiment and have fun?
Whether you're a newcomer to the Makerspace or just need a refresher, this guide will take you through the steps of 3D printing.
If you don't yet, have an idea of what you want to print, we recommend looking through Thingiverse for ready-to-print files and inspiration.
Print Preparation
Once you have an .STL file, you now need to turn it into machine code that can be read by the 3D printer, a .gcode, using a slicer. We have Ultimaker 2+ printers, so you will need to use Ultimaker Cura. It’s free to install or you can use one of the computers in the Makerspace
Setting up Cura

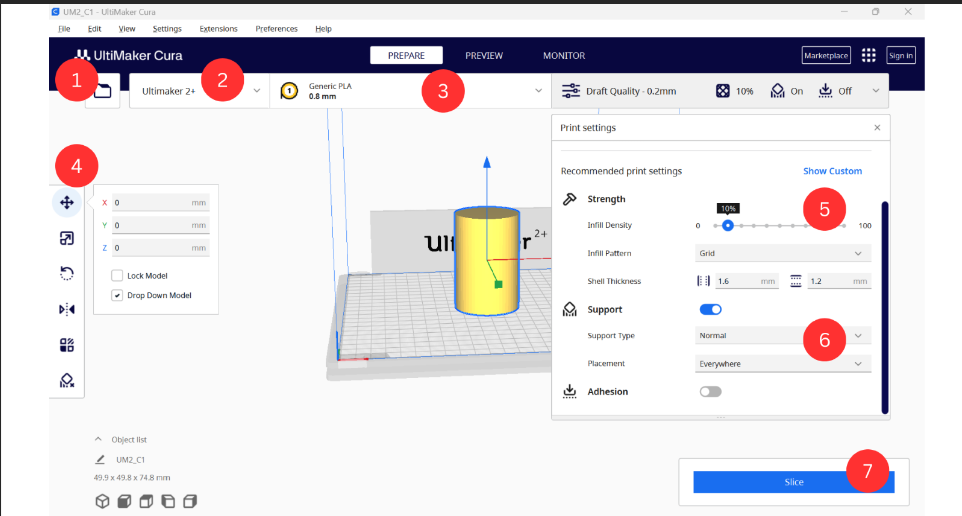
- Use this button to access your files and bring in your .STL file. It will automatically be centered on the build plate.
- Ensure you have Ultimaker 2+ selected. If you don’t, click this button, then-> Add printer -> Ultimaker printer -> Add local printer -> Add non-networked printer -> Chose the Ultimaker 2+ option -> Add.
- Here, you choose your nozzle size. The nozzle size that you choose depends on the piece you’re printing. Generally, the more detailed and the smaller the print is, the smaller the nozzle size you’ll want. The bigger nozzle size you'll use, the faster your print will be. We recommend 0.4mm for more detailed prints or 0.8mm for less detailed and faster prints.
- This bar on the left is for setting up your piece. The settings are, descending order: Move, Scale, Rotate, Mirror, Per Model Settings, Support Blocker. Use these to set up your print in the most optimal orientation. An optimal orientation limits the amount of support your print will need, thus optimizing the speed as well.
- On the right side of the image is the print settings menu. These are settings that affect the way your model is printed. The infill density determines what percentage of your model will be filled with filament. We generally recommend somewhere around 10% for prints that won’t need to support weight or be under tension, and somewhere around 30% if you need a stronger print. We have example models so you can feel the differences between infill percentages on the display wall.
- This switch turns on supports, which are extra 3D printed parts that support parts of your print that will fail/print badly otherwise. To determine if your 3D-printed model needs supports, examine the design for overhangs or unsupported features that extend beyond a specific angle, usually around 45 degrees. Cura will automatically generate supports where they are needed once the support switch is switched on.
- Once you're happy with your settings, you can press this slice button to convert the STL into a gcode. It will give you an accurate time estimate.
Printing
To use a printer at the Makerspace, you need to sign in to the space and ask a staff member to use a printer. When you ask to use one of the printers, you will need to specify what nozzle size you want. You will receive an SD card and an identifying tag that tells you which printer is yours.
Insert an SD card into the computer or through an adapter (come ask for one at the front desk!) and the 'Save to disk' button, where the slice button was, will transform into 'Save to removable drive'. This saves your .gcode file straight to the SD card.
- Now you can bring your SD card to the printer and insert it in the SD card slot. You can hang the tag you were given on the hook, that is, to the left of the SD card slot.
- First, you’ll need to turn on the printer. The 'ON' switch is found on the back of the printer, it’ll be at the bottom left corner.
- Once on, select Print, then 'yourfilename.gcode' in the printer’s user interface. The printer will take a few minutes to heat up, then will begin to print. Monitor the print job for major errors in extrusion or adhesion of the plastic. If errors do occur in the print, it can be paused or aborted, (Tune>Abort), using the printer's interface.
- Before starting the print, ensure that:

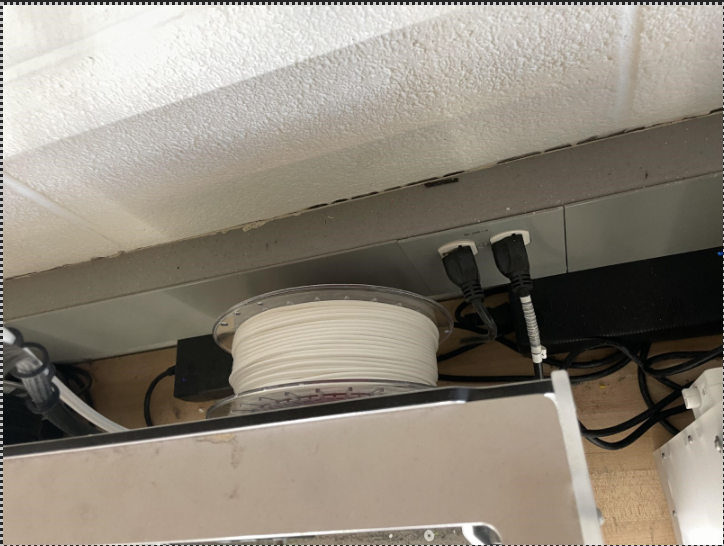
- The printer has enough filament for the print (found on the spool on the back of the printer),
- The nozzle and build plate are clear of debris,
- The print will be completed before the space closes.
Good to know
- Always feel free to ask the Makerspace staff if you are unsure about anything. They’re there to help!
- The slicer gives a time estimate and so does the printer. The estimate from Cura is the more accurate one, so don’t worry if the printer is giving you a longer estimate.
- After the print has been completed, allow the build plate to cool for a few minutes before trying to remove the print.
- Trim any excess plastic from the component (including support structures), and ensure the printer is clear of debris and ready for the next print.
- Please bring the SD card and tag back to the front desk.
- If you are not in the space when the print is done the print will be placed in the white drawers to the right of the printer wall (below the window).