Digital technologies/Textiles/Die-cutting using Cricut
Introduction
Die-cutting is the process of using a die(shaped blade), to cut low-strength materials such as metal sheet, fiberboard, vinyl or paper.
Die-cutting, nowadays is embraced by many people who indulged into making beautiful decorative items as shown in the picture.
The cut materials can be used to make stickers, to decorate objects such as mugs, to make crafts or can be applied on clothes using heat transfer.

The Cricut machine
A Cricut machine is a digital die-cutting machine that can cut all sorts of designs from materials like paper and vinyl.
There are different types of Cricut machines such as the Cricut Joy, the Cricut Joy Xtra and the Cricut Maker 3.
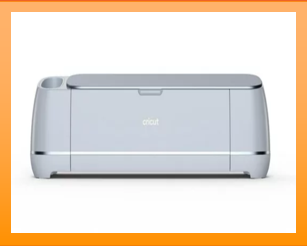
The one we have at the Makerspace is the Cricut Maker 3.
Components of the Cricut
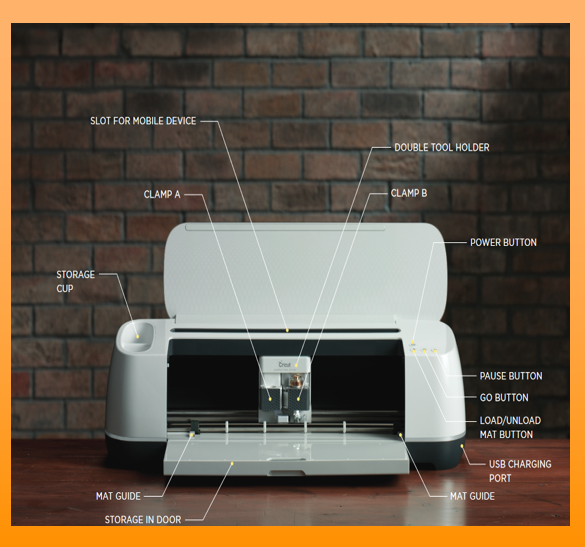
The picture below demonstrates the components of a Cricut machine. The ones which would be more frequently used during a simple cutting project would be:
- The power, pause, go and load/unload buttons
- Clamp B (For the blade)
- Mat guides
Note: Clamp A is for the pen used for calligraphy
Getting started
Requirements
To use the Cricut machine, you would need:
- A design file
- A laptop (You can either use your own laptop and install the software or the one available at the Makerspace, found in the cabinet at the Cricut and Heat Press Station, which has the software already installed.)
- Cricut Design Space software
- Proper operational instructions
- Safety instructions
Software Installation
Go to design.cricut.com to download the software for free. You will be asked to create a free account and follow the instructions given to connect to the Cricut machine.
Note: You can make your design before connecting to the Cricut machine.

Procedure
The following steps will show you, in chronological order, how to proceed to make something using the Cricut machine.
Overall Process
The overall process to use the Cricut machine can be summarized as follows:
- Preparing design using Cricut Design Space
- Connecting laptop to Cricut machine. It is possible to connect your laptop to the machine using the USB cable available or through Bluetooth.
- Placing the material, that you want to cut, on the mat and inserting mat into Cricut machine.
- Starting Cut
- Post cut proceedings
Before Cut
Software
Once you have created your account, follow the following steps to prepare your design.
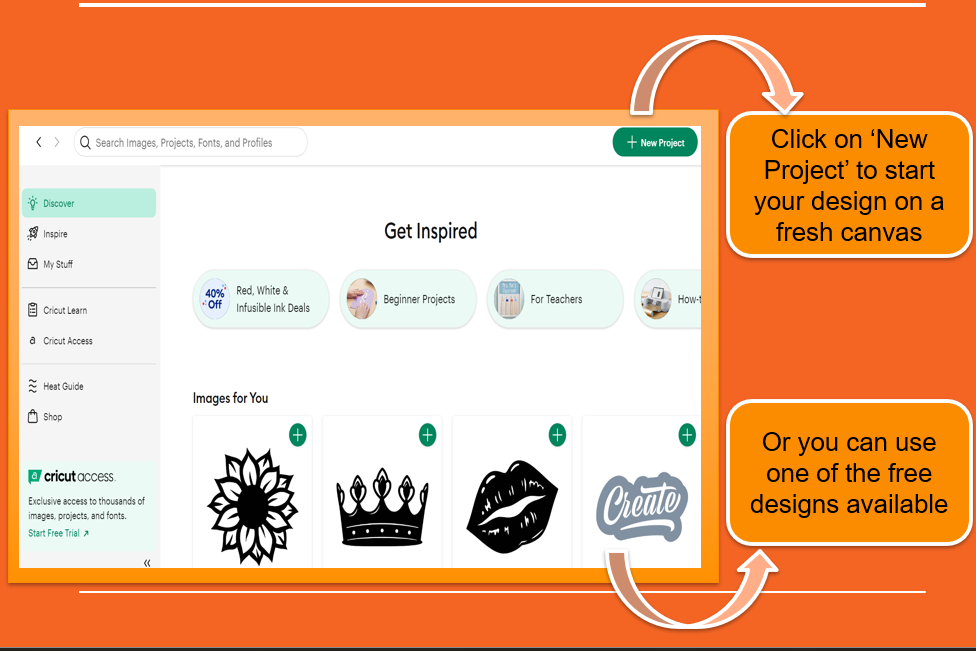
1. Click on ‘New Project’ to start your design on a fresh canvas. You can also use the designs available in the software, but note that while some of them are free, others come with a price.
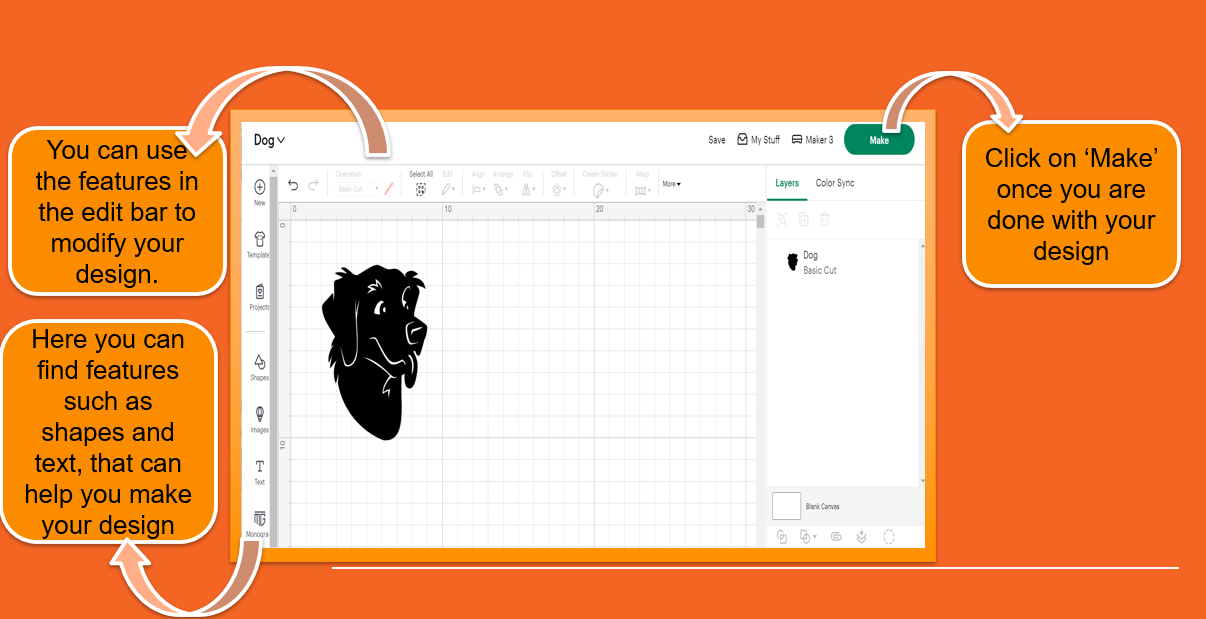
2. On the canvas, you will find a bunch of tools to make or modify your design. Click on ‘Make’ once you are done with your design
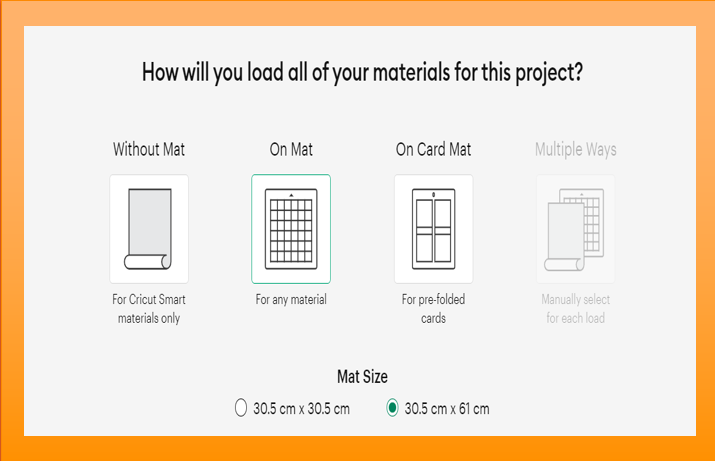
3. Upon clicking on ‘Make’, you will be prompted to choose a surface to load your materials. Choose one that corresponds to the material you are cutting, for example, you should choose Mat when working with iron-on vinyl. Remember to check the correct mat size as well.
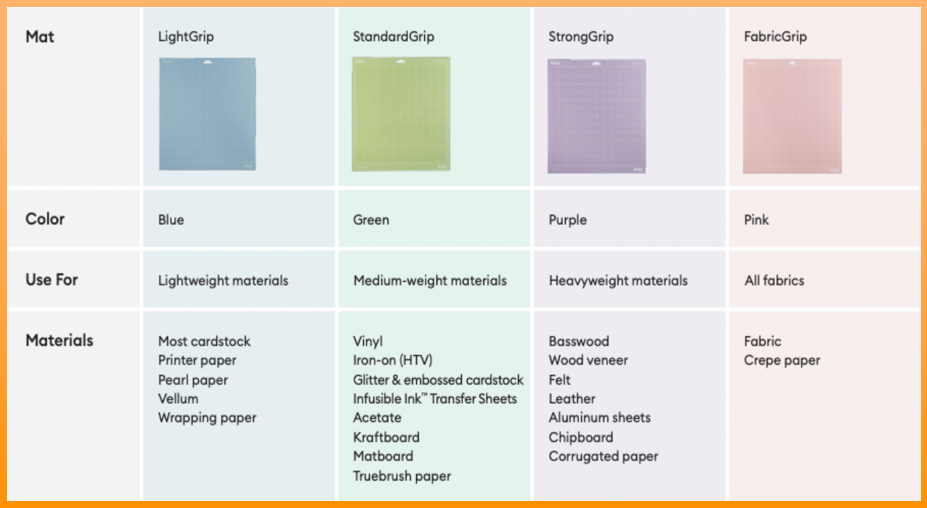
4. There are different types of mats for the range of materials that can be cut using a Cricut machine. The following picture can help you in knowing which mat you should use. On the other hand, smart materials require no mat to be loaded into the machine. They have been engineered in such a way that they would not be needing the additional support.
5. You should also be taking the size of the materials into account. There is a limit to the size of the material allowed to the machine.
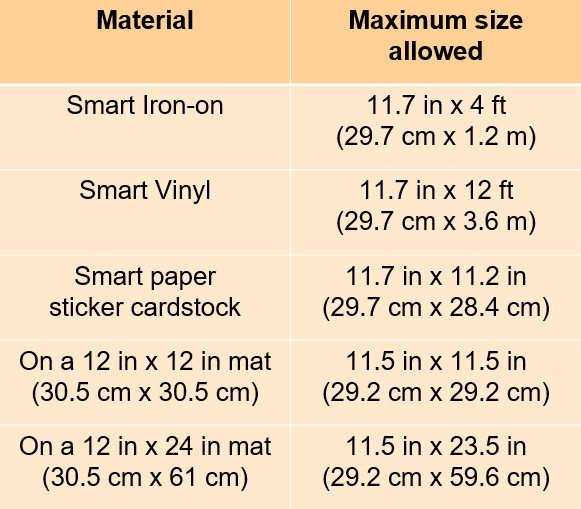
Note: The mat available at the makerspace is a 12 in x 24 in
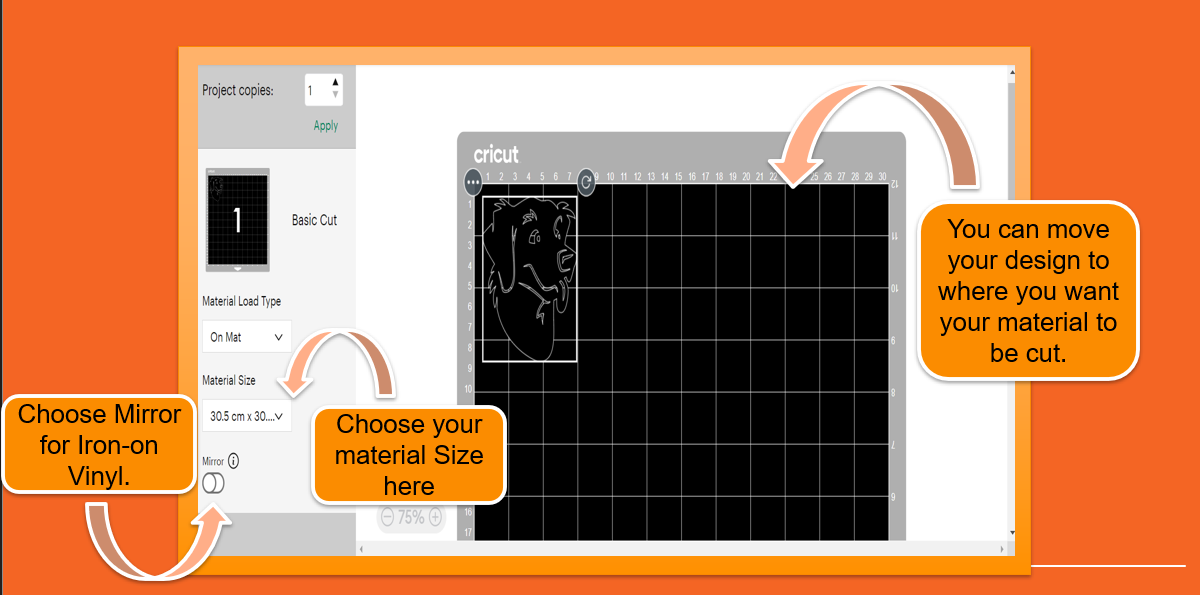
6. The following picture demonstrates a preview to where you want your material to be cut. Note that you should choose 'Mirror' for iron-vinyl since the orientation will be reflected when you will apply your design on a garment.
7. Finally, you will be prompted to connect your laptop to the machine and to choose your base material, that is, the material you will be cutting. Moreover, you will be given further instructions on how to load to mat. Click on 'Done' once you have made the necessary configuration.
Remember, you should be placing your mat between the mat guides.
Setting up the machine
Machine initialization and placing material
Once you have your design, click on continue and, connect your laptop or the one available at the Makerspace to the Cricut machine using the USB cable or pair with Bluetooth. Ensure that the machine is connected to the outlet.
1. Use the trimmer to measure and cut out the material you need.

2. Place your material on the mat. Do not throw the plastic protector, which was on the mat ,away. Put it back on the mat after use.

3. Use the scraper to firmly adhere your material to the mat.

4. Press the ‘ON’ button on the Cricut machine.
5. Ensure that there is a blade in Clamp B Clamp is generally loaded with the blade for cutting operations.

Clamp A is loaded with a pen to make calligraphies.

6. Place the mat inside the Cricut between the mat guides and click on the blinking load/unload button to load the mat into the machine. The mat will be rolled once so that the machine measures its size, then again before the cut.

7. Click on the blinking play button to start the cut. 8. Keep watch on the machine when it is operating.
After Cut

After the cut,
- Use the load/unload button to remove the mat.
- The spatula can be used to remove the cut-out piece from the mat’s surface.
- The scissors can be used to cut the material where your cut part is situated or for any additional trimmings.
- Use the weeding tool and the tweezers to help in removing and holding smaller cut-out parts, respectively.
- The scraper is useful when applying transfer tape to your design or when applying your design to a surface.
Using the Heat Press
The heat press would be integral when your dealing with iron-on vinyl.
Follow the following steps to use the heat press at the Makerspace:
- Plug the heat press and set a temperature of 305 ̊ F/151.7 ̊C, if you are using iron-on vinyl from the Makerspace.
- Position your design on your fabric with the shiny side facing upwards.
- Place your fabric under the head of the heat press, ensuring that the design is centered under it.
- Press the head of the heat press down onto the fabric using the clamp and wait 10 seconds, if using iron-on vinyl from the Makerspace.
- Lift the clamp on the heat press, press again if necessary, then remove the fabric.
- Remove the sticky backing from the fabric and allow to cool

Note: Temperature settings and the quantity of time you should wait depend on the material you are using.
Safety considerations
Safety should always be taken into account during any project you are working on. For a smooth operation, keep in mind the following instructions:
Cricut machine
- Prevent blade contact with hand or body to avoid injury.
- Do not open, modify or tamper with the machine
- Turn the machine off before unplugging.
- Do not place your fingers or other objects in the machine while it is powered on or during a cutting operation.
- Disconnect machine when not in use by unplugging the cord from the outlet.
- Be careful, the mat will be rolled quickly when the load/unload button is pressed.
Heat Press
- Avoid using materials which are sensitive to heat in the Heat Press.
- Leave the Heat Transfer pad open after or between use.
- Do not put your hand on the Heat Transfer pad when the Heat Press is on to avoid burns.
- Disconnect the electrical cord from outlet after use.
If you are feeling unsure about the operation of the machines, kindly seek assistance from a staff member at the Makerspace.
Materials at the Makerspace

The material that is usually used in the Cricut machine, at the Makerspace, is the iron-on vinyl, also known as HTV-Heat Transfer Vinyl.
To put your design on your fabric:
- You need to place the vinyl, with the shiny side up on your fabric.
- Apply heat using the heat press.
Some other materials at the Makerspace would be adhesive vinyl(permanent and removable), pre-folded cards and smart materials. Each category of materials come with some slight changes that should be made during their applications.
| Material | How to apply to a surface post-cut? |
|---|---|
| Adhesive Vinyl: Permanent and Removable |
Note: Permanent Vinyl has a stronger adhesive than Removable Vinyl |
| Pre-folded cards |
Note: Don’t go over fold line when applying backer. |
| Smart Vinyl(Removable and Permanent) |
|
| Smart paper sticker card stock |
|
| Smart Iron-on |
|
Uses of the Cricut machine
The Cricut machine can also be used to make crafts, wishing cards and personalize items with its cutter or pen, with calligraphies.