Digital technologies/Laser cutting/Laser cutting- Beginner/How to Laser Cut in the Makerspace/Zing: Difference between revisions
| Line 21: | Line 21: | ||
* The Laser Cutter: Machine that will cut the material. | * The Laser Cutter: Machine that will cut the material. | ||
*Laptop: The laptop is used to upload the design that need to be cut to the laser. It is also used to configure all the necessary setting of the laser. Note that the operating system running on the laptop is Windows 7. | |||
* Laptop: The laptop is used to upload the design that need to be cut to the laser. It is also used to configure all the necessary setting of the laser. Note that the operating system running on the laptop is Windows 7. | *Air Filter: The filter should always be attached while performing a cut, the laser cutter is not to be used without the filter, this ensures that the air in the room is safe for users and limits potentially hazardous debris. | ||
* Air Filter: The filter should always be attached while performing a cut, the laser cutter is not to be used without the filter, this ensures that the air in the room is safe for users and limits potentially hazardous debris. | [[File:Air Filter.jpg|thumb|Air Filter|link=Special:FilePath/Air_Filter.jpg]] | ||
[[File:Air Filter.jpg|thumb|Air Filter]] | *Air Compressor (compressed air): A steady flow of air to blow smoke and cutting residue away from the beam path and optics of a laser cutter. It's simple, but critical; without it, smoke can obscure and reflect the laser beam, foul lenses and mirrors, and severely degrade cut quality. | ||
* Air Compressor (compressed air): A steady flow of air to blow smoke and cutting residue away from the beam path and optics of a laser cutter. It's simple, but critical; without it, smoke can obscure and reflect the laser beam, foul lenses and mirrors, and severely degrade cut quality. | [[File:Air Compressor.jpg|thumb|Air Compressor|link=Special:FilePath/Air_Compressor.jpg]] | ||
[[File:Air Compressor.jpg|thumb|Air Compressor]] | |||
=== Control Panel<ref name=":0">https://www.epiloglaser.com/assets/downloads/manuals/zing-manual-web.pdf</ref> === | |||
===Control Panel<ref name=":0">https://www.epiloglaser.com/assets/downloads/manuals/zing-manual-web.pdf</ref>=== | |||
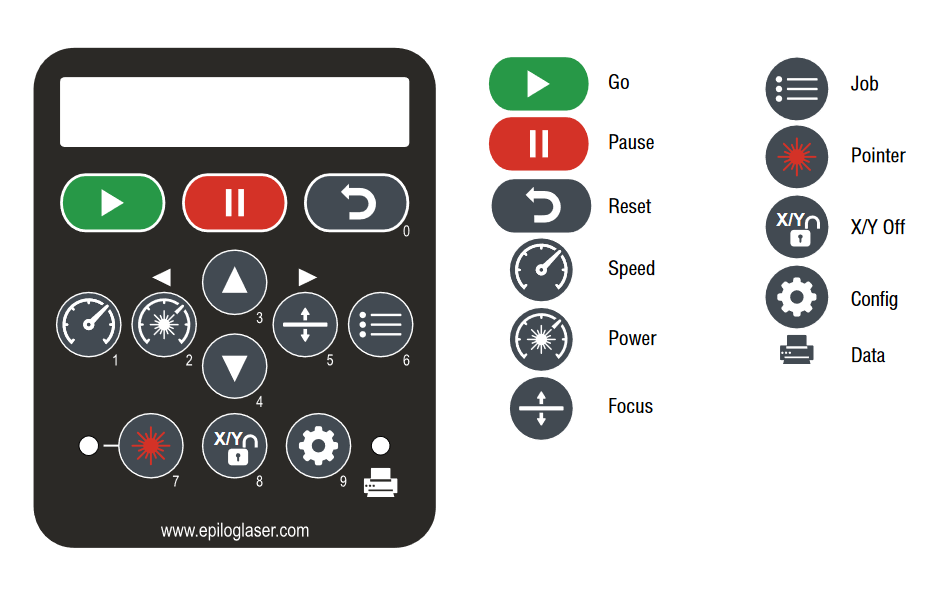
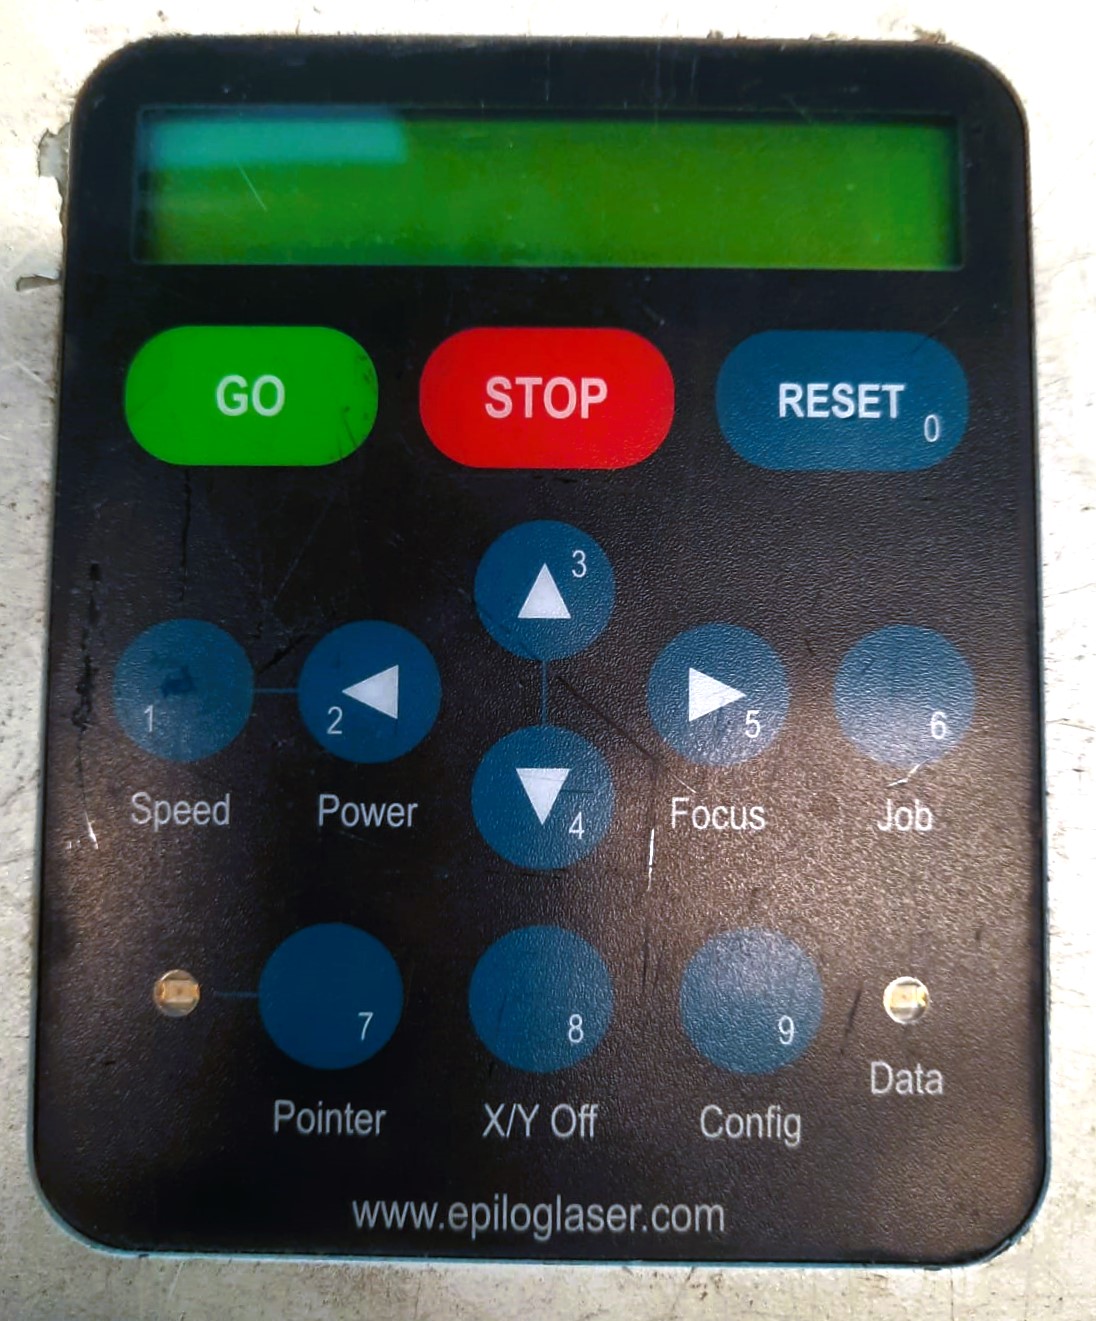
One way for the user to interact with the laser is by using the control panel. The list below describes the properties of each button found in the laser cutter control panel. | One way for the user to interact with the laser is by using the control panel. The list below describes the properties of each button found in the laser cutter control panel. | ||
[[File:ControlPanel.png|thumb|Control Panel]] | [[File:ControlPanel.png|thumb|Control Panel]] | ||
[[File:ControlPanelZing.jpg|thumb|Control Panel on Epilog Zing]] | [[File:ControlPanelZing.jpg|thumb|Control Panel on Epilog Zing]] | ||
# '''Go:''' Start or stop a job or process | #'''Go:''' Start or stop a job or process | ||
# '''Pause:''' Stop a process. When rastering ,it will stop right away. When vectoring, it will only stop once it has finished its current path | #'''Pause:''' Stop a process. When rastering ,it will stop right away. When vectoring, it will only stop once it has finished its current path | ||
# '''Reset:''' Move the head back to Home position. | #'''Reset:''' Move the head back to Home position. | ||
# '''Speed:''' While rastering you can adjust the speed by pushing this button on and using the arrow keys | #'''Speed:''' While rastering you can adjust the speed by pushing this button on and using the arrow keys | ||
# '''Power:''' While rastering you can adjust the power by pushing this button on and using the arrow keys | #'''Power:''' While rastering you can adjust the power by pushing this button on and using the arrow keys | ||
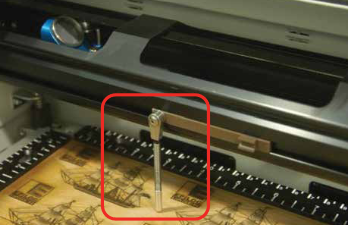
# '''Focus:''' Press this button, then either the up or down button to raise or lower the bed. Using this process along with the focusing tool, you can focus the laser. Note, the focusing tool for the Epilog Zing is different from the other laser cutters, it is attached inside the machine itself and can move back and forth, hence showing the distance between it and the material to be cut. | #'''Focus:''' Press this button, then either the up or down button to raise or lower the bed. Using this process along with the focusing tool, you can focus the laser. Note, the focusing tool for the Epilog Zing is different from the other laser cutters, it is attached inside the machine itself and can move back and forth, hence showing the distance between it and the material to be cut. | ||
# '''Job:''' Press this button to display the file name of the last job stored in memory. The arrow keys can also be used to scroll through all the saved jobs. | #'''Job:''' Press this button to display the file name of the last job stored in memory. The arrow keys can also be used to scroll through all the saved jobs. | ||
# '''Pointer:''' Turn on/off the red light pointer | #'''Pointer:''' Turn on/off the red light pointer | ||
#'''X/Y Off:''' Press this button to disable the X and Y motors and move the laser head around manually | #'''X/Y Off:''' Press this button to disable the X and Y motors and move the laser head around manually | ||
# '''Config:''' Access to the calibration settings. | #'''Config:''' Access to the calibration settings. | ||
# '''Data:''' This light will illuminate when data is being passed to the laser, useful when checking if your computer is connected to the laser cutter. | #'''Data:''' This light will illuminate when data is being passed to the laser, useful when checking if your computer is connected to the laser cutter. | ||
=== Properties === | ===Properties=== | ||
The other way for the user to interact with the laser cutter is by setting up the laser properties for a cut. | The other way for the user to interact with the laser cutter is by setting up the laser properties for a cut. | ||
[[File:Properties.jpg|thumb|Properties|link=Special:FilePath/Properties.jpg]] | [[File:Properties.jpg|thumb|Properties|link=Special:FilePath/Properties.jpg]] | ||
# '''Resolution:''' The print resolution can set from 75 to 1000 Dots per inch (DPI), the higher the DPI the more time it takes for laser cutter to complete the job.Usually, the print resolution is set at 500 DPI, the settings on the laptop will demonstrate the same. | #'''Resolution:''' The print resolution can set from 75 to 1000 Dots per inch (DPI), the higher the DPI the more time it takes for laser cutter to complete the job.Usually, the print resolution is set at 500 DPI, the settings on the laptop will demonstrate the same. | ||
# '''Auto Focus:'''In the Makerspace we use a manual focus instead of Auto Focus. Please, '''NEVER''' check the box, it will make the bed crash into the laser head | #'''Auto Focus:'''In the Makerspace we use a manual focus instead of Auto Focus. Please, '''NEVER''' check the box, it will make the bed crash into the laser head | ||
# '''Centre Engraving:''' it allows you to define the centre of the job. | #'''Centre Engraving:''' it allows you to define the centre of the job. | ||
# '''Job type''' | #'''Job type''' | ||
#* '''Raster:''' Used for engraving material. Vector lines that should be engraved should be set to 0.006” (0.152 mm) or greater line thickness. | #*'''Raster:''' Used for engraving material. Vector lines that should be engraved should be set to 0.006” (0.152 mm) or greater line thickness. | ||
#* '''Vector:''' Select when running cuts only. Vector lines that should be cut have to be set to 0.001” (0.0254 mm) or else it won’t recognized as cut. | #*'''Vector:''' Select when running cuts only. Vector lines that should be cut have to be set to 0.001” (0.0254 mm) or else it won’t recognized as cut. | ||
#* '''Combined:''' Select when running both cutting and engraving. | #*'''Combined:''' Select when running both cutting and engraving. | ||
# '''Piece size:''' Enter the size of the document size of the job. | #'''Piece size:''' Enter the size of the document size of the job. | ||
# '''Raster Settings:''' | #'''Raster Settings:''' | ||
#* '''Speed:''' Determines the travel speed of the laser. It can be increased increments of 1%. The lower the speed, the deeper the cut. Each materials have their own specific value and can be in “Suggested Material settings” which is located on the Maker mobile. | #*'''Speed:''' Determines the travel speed of the laser. It can be increased increments of 1%. The lower the speed, the deeper the cut. Each materials have their own specific value and can be in “Suggested Material settings” which is located on the Maker mobile. | ||
#* '''Power:''' Determines the amount of laser energy that is delivered to the piece being cut/engraved and is adjustable in 1% increments. Each materials have their own specific value and can be in “Suggested Material settings” which is located on the Maker mobile. | #*'''Power:''' Determines the amount of laser energy that is delivered to the piece being cut/engraved and is adjustable in 1% increments. Each materials have their own specific value and can be in “Suggested Material settings” which is located on the Maker mobile. | ||
# '''Vector Settings:''' | #'''Vector Settings:''' | ||
#* '''Speed:''' Determines the travel speed of the laser. It can be increased increments of 1%. The lower the speed, the deeper the cut. Each materials have their own specific value and can be in “Suggested Material settings” which is located on the Maker mobile. | #*'''Speed:''' Determines the travel speed of the laser. It can be increased increments of 1%. The lower the speed, the deeper the cut. Each materials have their own specific value and can be in “Suggested Material settings” which is located on the Maker mobile. | ||
#* '''Power:''' Determines the amount of laser energy that is delivered to the piece being cut/engraved and is adjustable in 1% increments. Each materials have their own specific value and can be in “Suggested Material settings” which is located on the Maker mobile. | #*'''Power:''' Determines the amount of laser energy that is delivered to the piece being cut/engraved and is adjustable in 1% increments. Each materials have their own specific value and can be in “Suggested Material settings” which is located on the Maker mobile. | ||
#* '''Frequency:''' Determines the number of laser pulses per inch of cut. Lower frequency means less heat is being applied to the material. The frequency can range between 1 to 5000 Hz. Each materials have their own specific value and can be in “Suggested Material settings” which is located on the Maker mobile. | #*'''Frequency:''' Determines the number of laser pulses per inch of cut. Lower frequency means less heat is being applied to the material. The frequency can range between 1 to 5000 Hz. Each materials have their own specific value and can be in “Suggested Material settings” which is located on the Maker mobile. | ||
== How to Laser cut? == | == How to Laser cut?== | ||
The laser cutting process with the Epilog Zing is as follows: | The laser cutting process with the Epilog Zing is as follows: | ||
# Prepare your file and select your material | #Prepare your file and select your material | ||
# Move your file to the laser cutter computer (you may use one of the many USB keys owned by the Makerspace) | #Move your file to the laser cutter computer (you may use one of the many USB keys owned by the Makerspace) | ||
# Turn on laser cutter setup | #Turn on laser cutter setup | ||
# Prepare laser cutter | #Prepare laser cutter | ||
# Click print and select print settings | #Click print and select print settings | ||
# Start the cut | #Start the cut | ||
# Turn off laser cutter setup | #Turn off laser cutter setup | ||
# Clean up | #Clean up | ||
=== Prepare your file and select your material === | ===Prepare your file and select your material=== | ||
Before you are going to start laser cutting, you need to get some prep work out of the way. First you need to create or select your file. If you are rastering an image, you can select or create an image in any program or use an existing picture. If you are rastering an image, you can select or create an image in any program or use an existing picture. | Before you are going to start laser cutting, you need to get some prep work out of the way. First you need to create or select your file. If you are rastering an image, you can select or create an image in any program or use an existing picture. If you are rastering an image, you can select or create an image in any program or use an existing picture. | ||
If you want to add vector cuts, you need to use a program that has the ability to create vectors. We use a free program called Inkscape. A guide on how to use the program can be [[Digital technologies/Laser cutting/Vector graphics- Beginner|found here]]. Unfortunately, you can’t print directly from Inkscape, you need to simply save your file as .pdf. | If you want to add vector cuts, you need to use a program that has the ability to create vectors. We use a free program called Inkscape. A guide on how to use the program can be [[Digital technologies/Laser cutting/Vector graphics- Beginner|found here]]. Unfortunately, you can’t print directly from Inkscape, you need to simply save your file as .pdf. | ||
=== Move file to the laser cutter laptop === | ===Move file to the laser cutter laptop=== | ||
Once you have saved your file as a .pdf, move it to a USB drive and bring it over to the laser cutter laptop. Open your file on the laptop. | Once you have saved your file as a .pdf, move it to a USB drive and bring it over to the laser cutter laptop. Open your file on the laptop. | ||
=== Turn on the laser cutter === | ===Turn on the laser cutter === | ||
There are three items to turn on: | There are three items to turn on: | ||
* '''Laser cutter:''' Switch on left hand side at the back. When you turn on the laser cutter, let the head move around freely. Refrain from touching any other buttons until it has finished this process. | *'''Laser cutter:''' Switch on left hand side at the back. When you turn on the laser cutter, let the head move around freely. Refrain from touching any other buttons until it has finished this process. | ||
* '''Air filter:''' Power button at bottom front. | *'''Air filter:''' Power button at bottom front. | ||
* '''Air compressor:''' Switch Located on top left hand side | *'''Air compressor:''' Switch Located on top left hand side | ||
=== Prepare the laser cutter === | === Prepare the laser cutter=== | ||
The laser cutter needs to be adapted to the material and image you are going to cut. This is done by changing the height and the laser’s home. The height affects the laser’s focus, and the home is related to the center engraving. More information about this can be found on the laser settings page. | The laser cutter needs to be adapted to the material and image you are going to cut. This is done by changing the height and the laser’s home. The height affects the laser’s focus, and the home is related to the center engraving. More information about this can be found on the laser settings page. | ||
* '''Setting home:''' This is setting the origin for the laser. If you do not have center engraving, select. This will be the top left-hand corner of the piece. For more information, see the laser setting page. | *'''Setting home:''' This is setting the origin for the laser. If you do not have center engraving, select. This will be the top left-hand corner of the piece. For more information, see the laser setting page. | ||
*# Make sure the laser cutter is on. | *#Make sure the laser cutter is on. | ||
*# Press the pointer button. You should see a red dot under the laser head. That is the current location of the laser. | *#Press the pointer button. You should see a red dot under the laser head. That is the current location of the laser. | ||
*# Press X/Y off. You should be able to freely move the laser cutter head. | *#Press X/Y off. You should be able to freely move the laser cutter head. | ||
*# Move the laser head so that the red dot is at the desired origin. | *#Move the laser head so that the red dot is at the desired origin. | ||
*# Press set home. You should no longer be able to move the laser head and you home is set. | *#Press set home. You should no longer be able to move the laser head and you home is set. | ||
[[File:Focusing Tool.png|thumb|Focusing Tool]] | [[File:Focusing Tool.png|thumb|Focusing Tool]] | ||
* '''Focusing laser:''' We '''do not''' use the automatic focus function on the laser (Please, '''NEVER''' check the box for Auto-Focus it will break the laser), therefore you need to manually focus the laser before your cut. | *'''Focusing laser:''' We '''do not''' use the automatic focus function on the laser (Please, '''NEVER''' check the box for Auto-Focus it will break the laser), therefore you need to manually focus the laser before your cut. | ||
*# Make sure the laser is on. | *#Make sure the laser is on. | ||
*# Place the material on the laser bed. You want to make sure that the area you are cutting is parallel to laser bed and the track on which the laser head moves. If there is a variation in height, you will see a variation in properties of the rastering and vectoring done by the laser | *#Place the material on the laser bed. You want to make sure that the area you are cutting is parallel to laser bed and the track on which the laser head moves. If there is a variation in height, you will see a variation in properties of the rastering and vectoring done by the laser | ||
*# Use the focusing tool present inside the laser cutter. | *#Use the focusing tool present inside the laser cutter. | ||
*# Press the Focus button on the laser cutter control panel. The laser head will move over slightly, make sure that the material is still under the manual focus. | *#Press the Focus button on the laser cutter control panel. The laser head will move over slightly, make sure that the material is still under the manual focus. | ||
*# Using the up and down arrows, lower or raise the bed until the manual focus guide is resting on the material without being lifted off the base. Try to swing the focusing tool back and forth. If the tool doesn't move freely after its first swing, that is, it returns to its original position, the laser has been correctly focused. | *#Using the up and down arrows, lower or raise the bed until the manual focus guide is resting on the material without being lifted off the base. Try to swing the focusing tool back and forth. If the tool doesn't move freely after its first swing, that is, it returns to its original position, the laser has been correctly focused. | ||
=== Click print and select settings === | ===Click print and select settings=== | ||
| Line 114: | Line 114: | ||
On the computer, click print. The print setup window will appear. | On the computer, click print. The print setup window will appear. | ||
# Change the printer to the laser cutter you are going to be using. | #Change the printer to the laser cutter you are going to be using. | ||
# Click on properties. This will bring up a page on the laser cutter settings. Consult the laser cutter manual for the proper speed and vector settings. More information on settings can be found on the Laser Settings page. When you are done selecting all your settings, click ok. This will take you back to the print page. | # Click on properties. This will bring up a page on the laser cutter settings. Consult the laser cutter manual for the proper speed and vector settings. More information on settings can be found on the Laser Settings page. When you are done selecting all your settings, click ok. This will take you back to the print page. | ||
# Make sure that the picture is set to Actual size. If it is set to fit the vector lines will most likely not work. | #Make sure that the picture is set to Actual size. If it is set to fit the vector lines will most likely not work. | ||
# Select orientation, either auto, portrait, or landscape. Most of the time, this will be set to auto portrait/landscape. This means that the laser will look at the size of the image you are attempting to cut and the size that you have added in the properties page. It will attempt to place the image in the way that it will fit best. If you want your image in a specific direction, select either portrait or landscape. | # Select orientation, either auto, portrait, or landscape. Most of the time, this will be set to auto portrait/landscape. This means that the laser will look at the size of the image you are attempting to cut and the size that you have added in the properties page. It will attempt to place the image in the way that it will fit best. If you want your image in a specific direction, select either portrait or landscape. | ||
When all settings are chosen, click print. If you look over to the laser cutter the name of the file should appear on the control panel. Wait until the data light is no longer flashing. | When all settings are chosen, click print. If you look over to the laser cutter the name of the file should appear on the control panel. Wait until the data light is no longer flashing. | ||
=== Start cut === | ===Start cut=== | ||
# Make sure that the glass cover is down and that you have prepared the laser. Check that your job is set on the display of the laser cutter. | # Make sure that the glass cover is down and that you have prepared the laser. Check that your job is set on the display of the laser cutter. | ||
# Press the green button, Go. | # Press the green button, Go. | ||
# While the laser cutter is cutting, do not leave the laser cutter unattended. If small flames appear, '''do not panic.''' As long as you piece is not actively burning, you are ok. If at any point you are unsure, pause your cut and find the Makerspace Coordinator on duty. You can pause your cut by pressing the red button, Stop, it will always finish the line that is cutting before it ends. If it needs to be stopped for safety purposes and it is not stopping with the Red Button, use the On/Off switch on the left side of the laser. Leave the lid closed. To resume, press the green button, Go. | #While the laser cutter is cutting, do not leave the laser cutter unattended. If small flames appear, '''do not panic.''' As long as you piece is not actively burning, you are ok. If at any point you are unsure, pause your cut and find the Makerspace Coordinator on duty. You can pause your cut by pressing the red button, Stop, it will always finish the line that is cutting before it ends. If it needs to be stopped for safety purposes and it is not stopping with the Red Button, use the On/Off switch on the left side of the laser. Leave the lid closed. To resume, press the green button, Go. | ||
=== Turn off laser cutter setup === | ===Turn off laser cutter setup=== | ||
When you are finished all your cuts, turn off the laser cutter, the air compressor, the air filter and disconnect the extension cord from the electrical outlet. | When you are finished all your cuts, turn off the laser cutter, the air compressor, the air filter and disconnect the extension cord from the electrical outlet. | ||
=== Clean up<ref name=":0" /> === | ===Clean up<ref name=":0" />=== | ||
[[File:Vector grid.png|thumb|Vector grid]] | [[File:Vector grid.png|thumb|Vector grid]] | ||
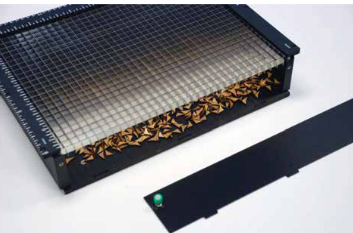
So that our laser remains operational, it is important that we clean up after each cut. | So that our laser remains operational, it is important that we clean up after each cut. | ||
* Remove the vector grid from the laser cutter. | *Remove the vector grid from the laser cutter. | ||
* Loosen the green thumb crews to remove the front plate. | *Loosen the green thumb crews to remove the front plate. | ||
* Remove the debris | *Remove the debris | ||
* Fit the front plate back to the vector grid. | *Fit the front plate back to the vector grid. | ||
* Place the vector grid back into the laser cutter, carefully aligning the three circles on the vector grid on the vector circles of the laser cutter. | *Place the vector grid back into the laser cutter, carefully aligning the three circles on the vector grid on the vector circles of the laser cutter. | ||
== Laser Safety == | ==Laser Safety== | ||
== Troubleshooting Laser Cutter Issues | == Troubleshooting Laser Cutter Issues== | ||
# File not sending to the Laser Cutter | #File not sending to the Laser Cutter | ||
#* Try unplugging the USB Cable from the laser and plugging it back, the files should now be available on the Laser Screen | #*Try unplugging the USB Cable from the laser and plugging it back, the files should now be available on the Laser Screen | ||
#* Make sure to choose the Printer that has a "USB" at the end of the printer's name in Adobe Acrobat Reader | #*Make sure to choose the Printer that has a "USB" at the end of the printer's name in Adobe Acrobat Reader | ||
#* Try turning the laser Off and On. | #* Try turning the laser Off and On. | ||
# Vector not working: When sending a vector file, if the Laser Cutter makes a sound right away and doesn't start, it means something is probably wrong with the file. | #Vector not working: When sending a vector file, if the Laser Cutter makes a sound right away and doesn't start, it means something is probably wrong with the file. | ||
#* Make sure the line thickness is actually 0.001 inch. | #*Make sure the line thickness is actually 0.001 inch. | ||
#* Make sure opacity is at exactly 100%. | #* Make sure opacity is at exactly 100%. | ||
#* Make sure that the Vector or Combined setting in the Epilog Driver is selected. | #*Make sure that the Vector or Combined setting in the Epilog Driver is selected. | ||
#* Try opening the file back in Inkscape or your preferred vector software and make sure the lines are a solid color | #*Try opening the file back in Inkscape or your preferred vector software and make sure the lines are a solid color | ||
# Laser starts shifting on the side | #Laser starts shifting on the side | ||
#* Stop the print and make sure the size doesn't exceed the size of the laser's bed (Zing 16"x12") | #*Stop the print and make sure the size doesn't exceed the size of the laser's bed (Zing 16"x12") | ||
#* Ask the staff to check the laser, but this issue will probably mean that the laser needs to go 'Out of Order' for maintenance | #* Ask the staff to check the laser, but this issue will probably mean that the laser needs to go 'Out of Order' for maintenance | ||
# Only part of the file gets printed | #Only part of the file gets printed | ||
#* Check your canvas size is the actual size or bigger that everything that is in that document | #*Check your canvas size is the actual size or bigger that everything that is in that document | ||
#* Make sure that in the Epilog Driver, the "Piece size" is bigger than the size of your document | #*Make sure that in the Epilog Driver, the "Piece size" is bigger than the size of your document | ||
== Resources == | ==Resources == | ||
* [[Laser Safety]] | *[[Laser Safety]] | ||
* [[Digital technologies/Laser cutting/Laser cutting- Beginner/Material Settings|Material Settings]]: '''If a material is unlisted in the allowed materials list, please consult a Makerspace employee''' '''for further guidance.''' | *[[Digital technologies/Laser cutting/Laser cutting- Beginner/Material Settings|Material Settings]]: '''If a material is unlisted in the allowed materials list, please consult a Makerspace employee''' '''for further guidance.''' | ||
* [https://en.makercase.com/#/ Makerbox]:Makerbox is a web-based case generator for laser cutting. It allows for the creation of boxes with live hinges at the corners. Unfortunately, it only outputs .DXF or .DWG file formats and does not support the export of 3D CAD models for modifications in a 3D CAD software. | *[https://en.makercase.com/#/ Makerbox]:Makerbox is a web-based case generator for laser cutting. It allows for the creation of boxes with live hinges at the corners. Unfortunately, it only outputs .DXF or .DWG file formats and does not support the export of 3D CAD models for modifications in a 3D CAD software. | ||
* [https://www.epiloglaser.com/assets/downloads/manuals/zing-manual-web.pdf Epilog Zing Manual] | *[https://www.epiloglaser.com/assets/downloads/manuals/zing-manual-web.pdf Epilog Zing Manual] | ||
== References == | ==References== | ||
<references /> | <references /> | ||
Revision as of 16:55, 13 June 2024
Epilog Zing
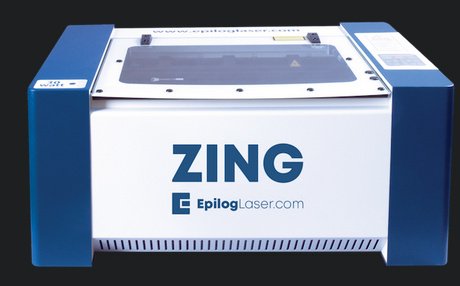
The Epilog Zing[1] is a 40 W CO2 laser with the ability to cut through a variety of materials such as MDF (Medium-Density Fiberboard) and acrylic which are commonly used during laser cutting projects at the Makerspace. While the procedure to operate an Epilog Zing remains mostly similar to the steps taken to operate the Epilog Mini and the Epilog Helix, there exist some differences that should be taken into account when dealing with the Epilog Zing. For example, the Epilog Zing can be carried in the Maker Mobile and is found in the Maker Lab.
| Power Type | [40W, CO2] |
|---|---|
| Build Volume (mm) | 730 × 562 × 298 mm |
| Build Volume (in) | 28.75 × 22.125 × 11.75 in |
| Compatible materials | See charts below |
| Maximum Resolution | 1000 dpi |
The Maker Mobile
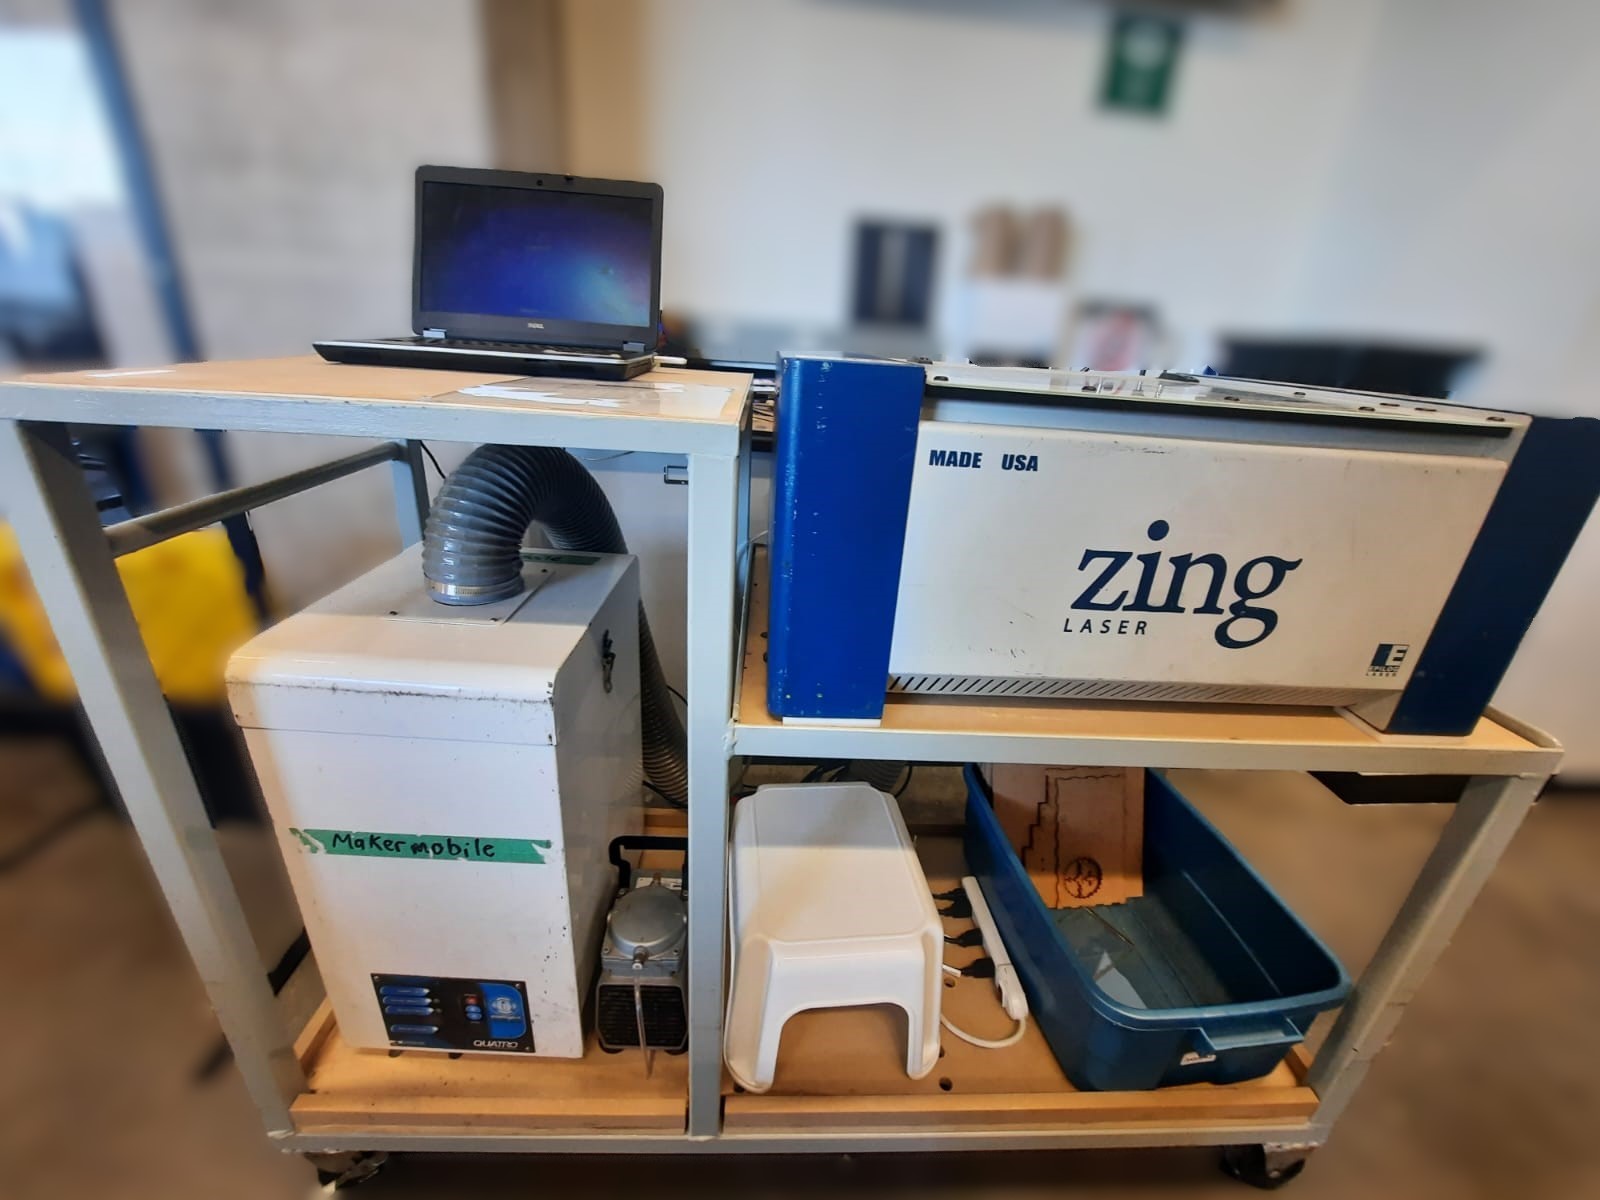
The Maker Mobile is a makerspace on wheels. Most of the equipment that can be found in a makerspace, can be carried directly to schools, libraries and even birthday parties. The Epilog Zing is one of the equipment that is carried on the Maker Mobile making it a portable machine. Apart from the laser cutter itself, there are other components that are required for its smooth operation. The elements are shown in the picture.
Laser Cutter Components
Laser Cutter Components
In order to use the Epilog Zing laser cutter, the 4 components that you need are:
- The Laser Cutter: Machine that will cut the material.
- Laptop: The laptop is used to upload the design that need to be cut to the laser. It is also used to configure all the necessary setting of the laser. Note that the operating system running on the laptop is Windows 7.
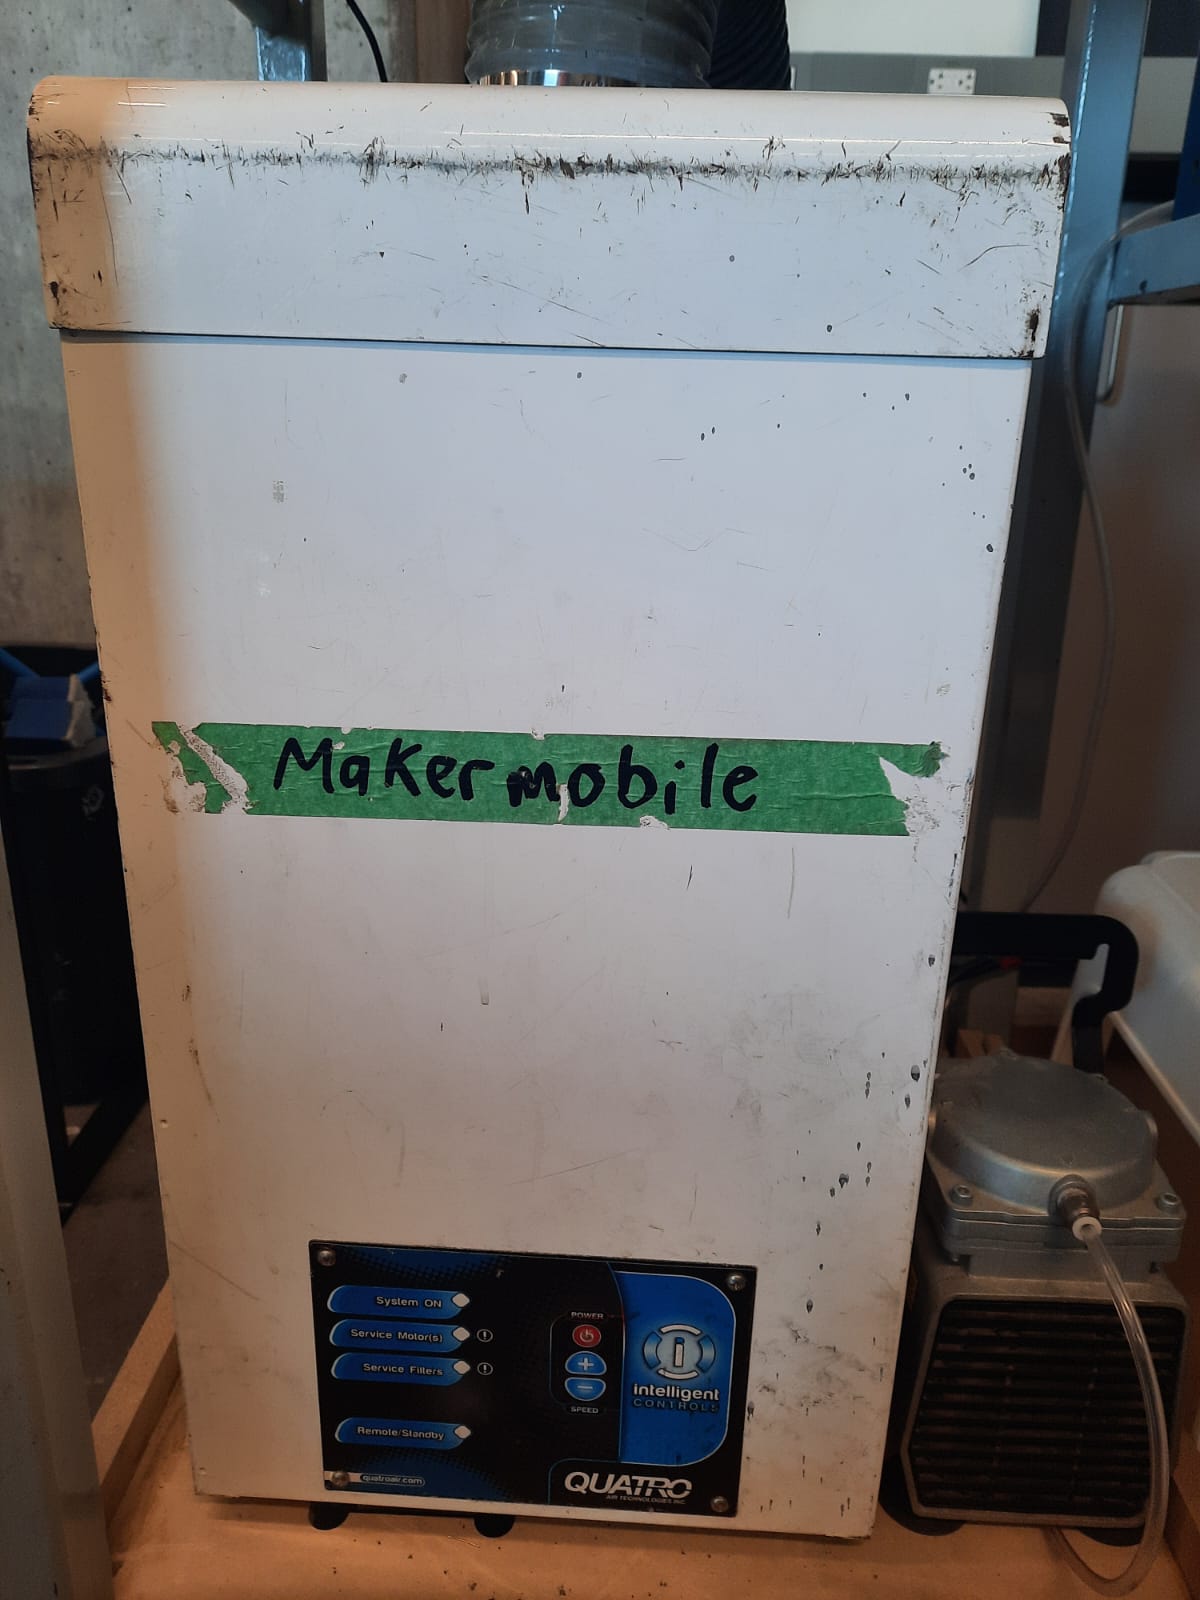
- Air Filter: The filter should always be attached while performing a cut, the laser cutter is not to be used without the filter, this ensures that the air in the room is safe for users and limits potentially hazardous debris.
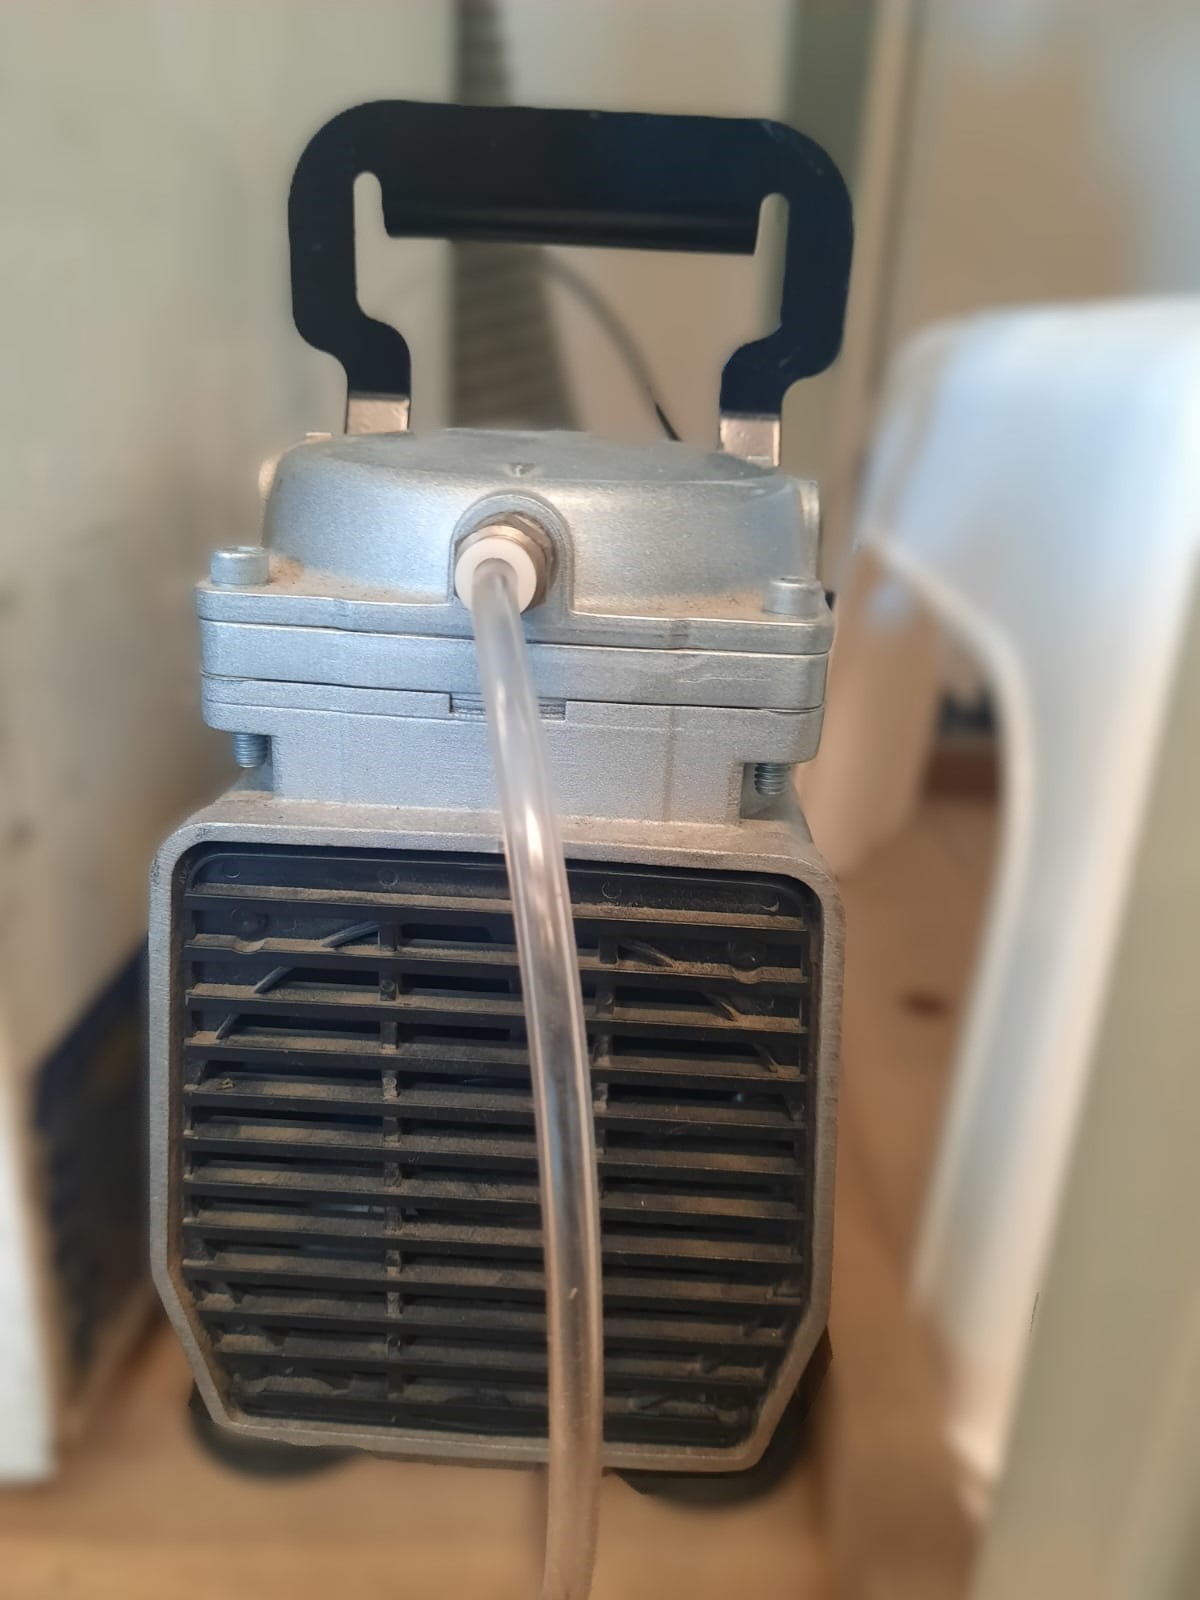
- Air Compressor (compressed air): A steady flow of air to blow smoke and cutting residue away from the beam path and optics of a laser cutter. It's simple, but critical; without it, smoke can obscure and reflect the laser beam, foul lenses and mirrors, and severely degrade cut quality.
Control Panel[2]
One way for the user to interact with the laser is by using the control panel. The list below describes the properties of each button found in the laser cutter control panel.
- Go: Start or stop a job or process
- Pause: Stop a process. When rastering ,it will stop right away. When vectoring, it will only stop once it has finished its current path
- Reset: Move the head back to Home position.
- Speed: While rastering you can adjust the speed by pushing this button on and using the arrow keys
- Power: While rastering you can adjust the power by pushing this button on and using the arrow keys
- Focus: Press this button, then either the up or down button to raise or lower the bed. Using this process along with the focusing tool, you can focus the laser. Note, the focusing tool for the Epilog Zing is different from the other laser cutters, it is attached inside the machine itself and can move back and forth, hence showing the distance between it and the material to be cut.
- Job: Press this button to display the file name of the last job stored in memory. The arrow keys can also be used to scroll through all the saved jobs.
- Pointer: Turn on/off the red light pointer
- X/Y Off: Press this button to disable the X and Y motors and move the laser head around manually
- Config: Access to the calibration settings.
- Data: This light will illuminate when data is being passed to the laser, useful when checking if your computer is connected to the laser cutter.
Properties
The other way for the user to interact with the laser cutter is by setting up the laser properties for a cut.
- Resolution: The print resolution can set from 75 to 1000 Dots per inch (DPI), the higher the DPI the more time it takes for laser cutter to complete the job.Usually, the print resolution is set at 500 DPI, the settings on the laptop will demonstrate the same.
- Auto Focus:In the Makerspace we use a manual focus instead of Auto Focus. Please, NEVER check the box, it will make the bed crash into the laser head
- Centre Engraving: it allows you to define the centre of the job.
- Job type
- Raster: Used for engraving material. Vector lines that should be engraved should be set to 0.006” (0.152 mm) or greater line thickness.
- Vector: Select when running cuts only. Vector lines that should be cut have to be set to 0.001” (0.0254 mm) or else it won’t recognized as cut.
- Combined: Select when running both cutting and engraving.
- Piece size: Enter the size of the document size of the job.
- Raster Settings:
- Speed: Determines the travel speed of the laser. It can be increased increments of 1%. The lower the speed, the deeper the cut. Each materials have their own specific value and can be in “Suggested Material settings” which is located on the Maker mobile.
- Power: Determines the amount of laser energy that is delivered to the piece being cut/engraved and is adjustable in 1% increments. Each materials have their own specific value and can be in “Suggested Material settings” which is located on the Maker mobile.
- Vector Settings:
- Speed: Determines the travel speed of the laser. It can be increased increments of 1%. The lower the speed, the deeper the cut. Each materials have their own specific value and can be in “Suggested Material settings” which is located on the Maker mobile.
- Power: Determines the amount of laser energy that is delivered to the piece being cut/engraved and is adjustable in 1% increments. Each materials have their own specific value and can be in “Suggested Material settings” which is located on the Maker mobile.
- Frequency: Determines the number of laser pulses per inch of cut. Lower frequency means less heat is being applied to the material. The frequency can range between 1 to 5000 Hz. Each materials have their own specific value and can be in “Suggested Material settings” which is located on the Maker mobile.
How to Laser cut?
The laser cutting process with the Epilog Zing is as follows:
- Prepare your file and select your material
- Move your file to the laser cutter computer (you may use one of the many USB keys owned by the Makerspace)
- Turn on laser cutter setup
- Prepare laser cutter
- Click print and select print settings
- Start the cut
- Turn off laser cutter setup
- Clean up
Prepare your file and select your material
Before you are going to start laser cutting, you need to get some prep work out of the way. First you need to create or select your file. If you are rastering an image, you can select or create an image in any program or use an existing picture. If you are rastering an image, you can select or create an image in any program or use an existing picture.
If you want to add vector cuts, you need to use a program that has the ability to create vectors. We use a free program called Inkscape. A guide on how to use the program can be found here. Unfortunately, you can’t print directly from Inkscape, you need to simply save your file as .pdf.
Move file to the laser cutter laptop
Once you have saved your file as a .pdf, move it to a USB drive and bring it over to the laser cutter laptop. Open your file on the laptop.
Turn on the laser cutter
There are three items to turn on:
- Laser cutter: Switch on left hand side at the back. When you turn on the laser cutter, let the head move around freely. Refrain from touching any other buttons until it has finished this process.
- Air filter: Power button at bottom front.
- Air compressor: Switch Located on top left hand side
Prepare the laser cutter
The laser cutter needs to be adapted to the material and image you are going to cut. This is done by changing the height and the laser’s home. The height affects the laser’s focus, and the home is related to the center engraving. More information about this can be found on the laser settings page.
- Setting home: This is setting the origin for the laser. If you do not have center engraving, select. This will be the top left-hand corner of the piece. For more information, see the laser setting page.
- Make sure the laser cutter is on.
- Press the pointer button. You should see a red dot under the laser head. That is the current location of the laser.
- Press X/Y off. You should be able to freely move the laser cutter head.
- Move the laser head so that the red dot is at the desired origin.
- Press set home. You should no longer be able to move the laser head and you home is set.
- Focusing laser: We do not use the automatic focus function on the laser (Please, NEVER check the box for Auto-Focus it will break the laser), therefore you need to manually focus the laser before your cut.
- Make sure the laser is on.
- Place the material on the laser bed. You want to make sure that the area you are cutting is parallel to laser bed and the track on which the laser head moves. If there is a variation in height, you will see a variation in properties of the rastering and vectoring done by the laser
- Use the focusing tool present inside the laser cutter.
- Press the Focus button on the laser cutter control panel. The laser head will move over slightly, make sure that the material is still under the manual focus.
- Using the up and down arrows, lower or raise the bed until the manual focus guide is resting on the material without being lifted off the base. Try to swing the focusing tool back and forth. If the tool doesn't move freely after its first swing, that is, it returns to its original position, the laser has been correctly focused.
Click print and select settings
On the computer, click print. The print setup window will appear.
- Change the printer to the laser cutter you are going to be using.
- Click on properties. This will bring up a page on the laser cutter settings. Consult the laser cutter manual for the proper speed and vector settings. More information on settings can be found on the Laser Settings page. When you are done selecting all your settings, click ok. This will take you back to the print page.
- Make sure that the picture is set to Actual size. If it is set to fit the vector lines will most likely not work.
- Select orientation, either auto, portrait, or landscape. Most of the time, this will be set to auto portrait/landscape. This means that the laser will look at the size of the image you are attempting to cut and the size that you have added in the properties page. It will attempt to place the image in the way that it will fit best. If you want your image in a specific direction, select either portrait or landscape.
When all settings are chosen, click print. If you look over to the laser cutter the name of the file should appear on the control panel. Wait until the data light is no longer flashing.
Start cut
- Make sure that the glass cover is down and that you have prepared the laser. Check that your job is set on the display of the laser cutter.
- Press the green button, Go.
- While the laser cutter is cutting, do not leave the laser cutter unattended. If small flames appear, do not panic. As long as you piece is not actively burning, you are ok. If at any point you are unsure, pause your cut and find the Makerspace Coordinator on duty. You can pause your cut by pressing the red button, Stop, it will always finish the line that is cutting before it ends. If it needs to be stopped for safety purposes and it is not stopping with the Red Button, use the On/Off switch on the left side of the laser. Leave the lid closed. To resume, press the green button, Go.
Turn off laser cutter setup
When you are finished all your cuts, turn off the laser cutter, the air compressor, the air filter and disconnect the extension cord from the electrical outlet.
Clean up[2]
So that our laser remains operational, it is important that we clean up after each cut.
- Remove the vector grid from the laser cutter.
- Loosen the green thumb crews to remove the front plate.
- Remove the debris
- Fit the front plate back to the vector grid.
- Place the vector grid back into the laser cutter, carefully aligning the three circles on the vector grid on the vector circles of the laser cutter.
Laser Safety
Troubleshooting Laser Cutter Issues
- File not sending to the Laser Cutter
- Try unplugging the USB Cable from the laser and plugging it back, the files should now be available on the Laser Screen
- Make sure to choose the Printer that has a "USB" at the end of the printer's name in Adobe Acrobat Reader
- Try turning the laser Off and On.
- Vector not working: When sending a vector file, if the Laser Cutter makes a sound right away and doesn't start, it means something is probably wrong with the file.
- Make sure the line thickness is actually 0.001 inch.
- Make sure opacity is at exactly 100%.
- Make sure that the Vector or Combined setting in the Epilog Driver is selected.
- Try opening the file back in Inkscape or your preferred vector software and make sure the lines are a solid color
- Laser starts shifting on the side
- Stop the print and make sure the size doesn't exceed the size of the laser's bed (Zing 16"x12")
- Ask the staff to check the laser, but this issue will probably mean that the laser needs to go 'Out of Order' for maintenance
- Only part of the file gets printed
- Check your canvas size is the actual size or bigger that everything that is in that document
- Make sure that in the Epilog Driver, the "Piece size" is bigger than the size of your document
Resources
- Laser Safety
- Material Settings: If a material is unlisted in the allowed materials list, please consult a Makerspace employee for further guidance.
- Makerbox:Makerbox is a web-based case generator for laser cutting. It allows for the creation of boxes with live hinges at the corners. Unfortunately, it only outputs .DXF or .DWG file formats and does not support the export of 3D CAD models for modifications in a 3D CAD software.
- Epilog Zing Manual
