Digital technologies/Laser cutting/Vector graphics- Beginner: Difference between revisions
| Line 15: | Line 15: | ||
First click and select the desired object until the straight, eight arrow shaped handles appear: | First click and select the desired object until the straight, eight arrow shaped handles appear: | ||
[[File:ScaleHandles.png|center|thumb|A rectangle object with handles that affect scale]] | [[File:ScaleHandles.png|center|thumb|A rectangle object with handles that affect scale]] | ||
To ''Move'' objects, click and select the desired object and drag it to the desired location. You can also hold Ctrl to restrict to horizontal or vertical | To ''Move'' objects, click and select the outline of the desired object and drag it to the desired location. Ensure that you select the outline of the object, as you will not be able to select the "Fill" (interior space) of the object. You can also hold Ctrl to restrict the movement to the horizontal or vertical axis. | ||
[[File:ControlBar.png|thumb|The Tools Control Bar]] | [[File:ControlBar.png|thumb|The Tools Control Bar]] | ||
To ''Scale'' the object, drag any of the handles. You can also hold Ctrl to preserve the original height/width ratio | To ''Scale'' the object, drag any of the handles. You can also hold Ctrl to preserve the original height/width ratio | ||
Revision as of 02:05, 21 August 2021
Vector graphics design is an important part of the design process when it comes to laser cutting. Unlike raster graphics, which are images defined by pixels in a grid, vector graphics are defined by a Cartesian plane connected by lines and curves. This is especially important for the laser cutter, as it will be able to follow the defined line path of the vector images.
There are many vector editing software's available but for the purposes of this article, we will be using Inkscape as it is free to download and open-source. The purpose of the article is to cover the basic Inkscape tools necessary for creating a laser cuttable vector design.
Setting up the page
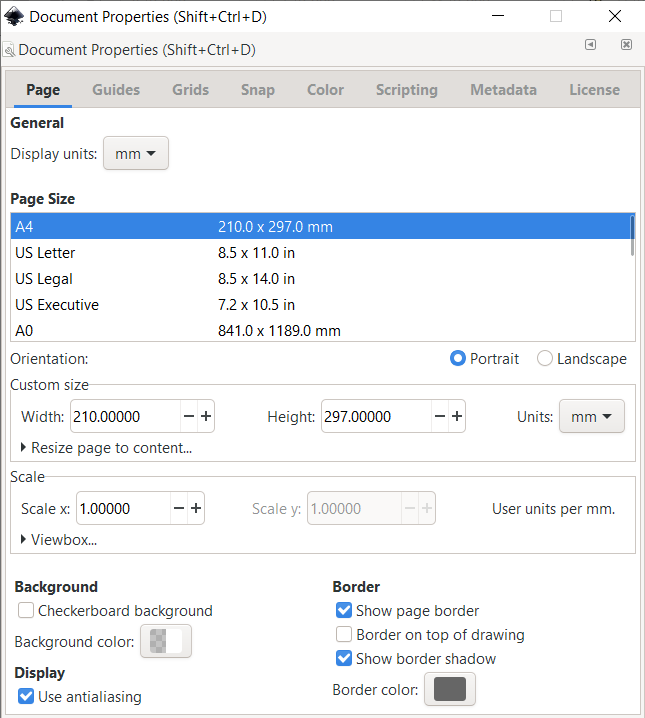
The Document Properties menu can be accessed from the File>Document Properties or the keyboard shortcut Shift+Ctrl+D. From here we can change our page size to either a standard size or a Custom size. Although not necessary, it is recommended that you set your page size to match either the dimensions of your material or the dimensions of the laser cutter so that you have a clearer understanding of your working area.

Creating Shapes
The shapes toolbar can be accessed on the left hand side of your screen. The most commonly used shape tools for laser cutting would be the rectangle, circle, and polygon tools. Each shape you create using the tools will display one or more handles that will either affect the dimensions or shape of the created object (i.e. adding rounded edges to a rectangle, or making a semi-circle).
Moving, Scaling, Rotating, and Skewing
First click and select the desired object until the straight, eight arrow shaped handles appear:
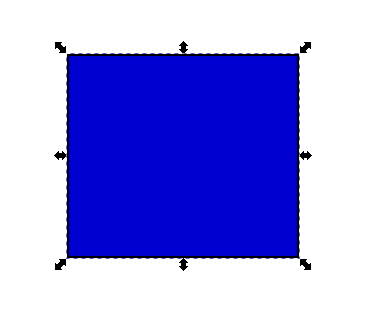
To Move objects, click and select the outline of the desired object and drag it to the desired location. Ensure that you select the outline of the object, as you will not be able to select the "Fill" (interior space) of the object. You can also hold Ctrl to restrict the movement to the horizontal or vertical axis.

To Scale the object, drag any of the handles. You can also hold Ctrl to preserve the original height/width ratio
If you have a precise location or size in mind for your desired object, you may also use the numeric entry fields in the Tool Controls bar to set exact X and Y coordinates for the object's location or exact W and H values for the dimensions of the object.
For rotating and skewing, click the object again until you notice the eight arrow shaped handles change in appearance. You’ll notice the corner handles will no longer be straight:
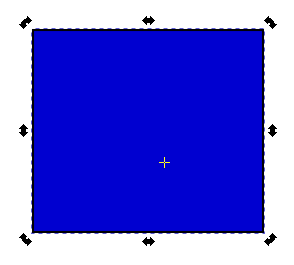
To Rotate the object, drag the corner handles. You can also hold Ctrl to restrict rotation to 15 degree intervals. You may also drag the cross mark to position the center of rotation.
To Skew (shear) the object, drag any of the non-corner handles. You may also hold Ctrl to restrict the skewing to 15 degree intervals.
Multiple Selections and Grouping
Sometimes you may need to move or change multiple objects at once, this is where multiple selections may be useful. To select multiple objects simultaneously you may either hold shift while clicking your desired objects, or hold down left click to drag a selection box around all your desired objects (This is called rubber band selection). If multiple objects are selected at once, any transformations, scaling, or rotation will affect them all simultaneously.
If you find yourself needing to frequently edit the same set of objects, or you’re happy with the placement of a set of objects in relation to one another, it may be useful to combine them into a group. Once combined into a group, the set of objects will behave as a single object once selected. To create a group, select multiple objects and press Ctrl+G or Object>Group.
If you wish to ungroup you may select the group and press Ctrl+U or Object>Ungroup. If you wish to edit an object within a group, you do not have to ungroup, you can simply Ctrl+Left-Click or double click the object.
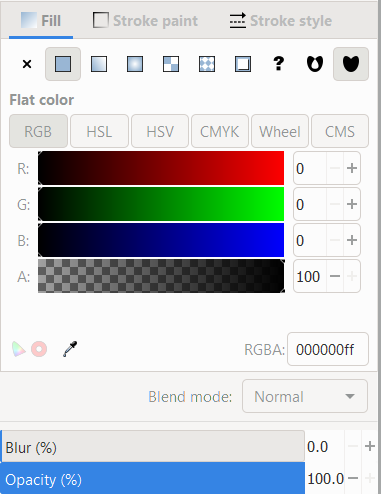
Fill and Stroke
The most important menu for vector design in the context of laser cutting, the Fill and Stroke menu allows you to edit the fill paint, stroke paint, and stroke style of a selected object. To access this menu select Object>Fill and Stroke or simply press Shift+Ctrl+F.
The Fill tab allows you to edit the fill (interior) of the selected object. There are options for no paint, flat paint, as well as various gradients and patterns. You may also select the colour paint through either your choice of RGB, CMYK, HSL, and Wheel colour pickers.
The Stroke paint tab allows you to edit the paint of the stroke (outline) of the object with the same paints and patterns of the Fill tab.
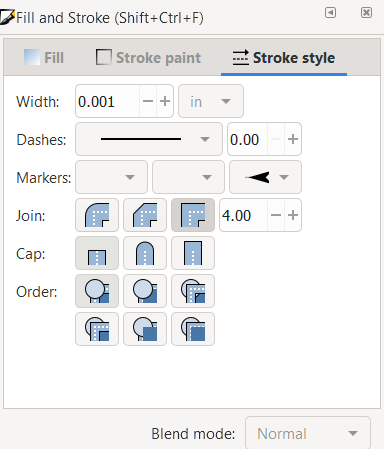
The Stroke style tab allows you to edit the width and pattern of the outline. This is an extremely important menu for laser cutting, for reasons covered later.
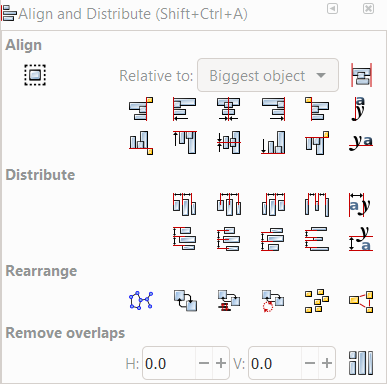
Align and Distribute
Unless you wish to place your objects completely randomly, chances are you want your objects placed in a way relative to one another (centered, leftmost, topmost, etc…), in which case the Align and Distribute menu may be useful. To access the Align and Distribute menu, go to Object>Align and Distribute or press Shift+Ctrl+A.
After selecting multiple objects, this menu will allow you to align and distribute the multiple objects according to the pattern you set, and relative to the area you defined.
Preparing Files for the Laser Cutter
Before saving your file, you must keep in mind which vectors you would like to be cut, and which ones you wish to be engraved. Lines that are meant to be cut must be defined at a stroke width of 0.001 inches. Using the Fill and Stroke menu, ensure that the lines wished to be cut are at the correct width and are solid in opacity and black in colour. You’ll notice that these strokes may become difficult to see, so it is recommended to save this step for the very end.
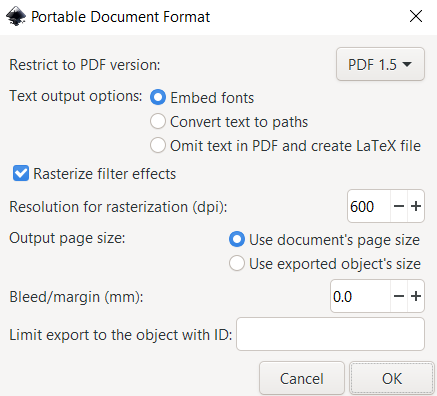
When you are ready to save your file for the laser cutter, click File>Save As, name your file something recognizable and select the file type as PDF. Another menu labeled “Portable Document File” will pop up, if you’re unsure what to set your Rasterization dpi to, set it to 600 and then hit Ok. You are now ready to bring the PDF design to the laser cutter!
