Difference between revisions of "Digital technologies/Laser cutting/Laser cutting- Beginner/Laser Cutter Components"
Jump to navigation
Jump to search
(Created page with "{{#lsth:Digital technologies/Laser cutting/Laser cutting- Beginner|Digital technologies/Laser cutting/Laser cutting- Beginner/Laser Cutter Components|Laser Cutter Components...") |
(No difference)
|
Latest revision as of 21:03, 28 July 2022
In order to use a laser cutter, there are 4 parts that need to be available:
- Laser Cutter: Machine that will cut the material
- Computer: The computer is used to upload the design that need to be cut to the laser. It is also used to configure all the necessary setting of the laser.
- Air Filter: The filter should always be attached while performing a cut, the laser cutter is not to be used without the filter, this ensures that the air in the room is safe for users and limits potentially hazardous debris
- Air Compressor (compressed air): A steady flow of air to blow smoke and cutting residue away from the beam path and optics of a laser cutter. It's simple, but critical; without it, smoke can obscure and reflect the laser beam, foul lenses and mirrors, and severely degrade cut quality.
Control Panel
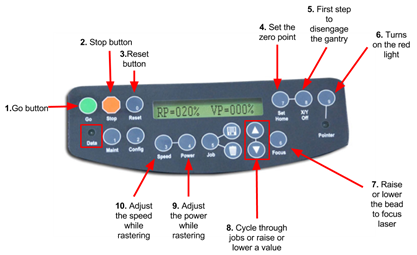
One way for the user to interact with the laser is by using the control panel. The list below describe the properties of each button found in the laser cutter control panel.
- Go:Start or stop a job or process
- Stop: Stop a process. When rastering it will stop right away. When vectoring it will only stop once it has finished its current path
- Reset: Moved the head back to its current home
- Set Home: Sets the zero point or starting point of the laser
- X/Y Off: Press this button and then go to disengage the motors and move the laser head around manually
- Pointer: Turn on the red light pointer
- Focus: Press this button then either the up or down button to raise or lower the bed. Using this process along with the focussing tool, you can focus the laser.
- ∆/∇:Cycle through the jobs or raise or lower the power, speed, or bed height
- Power: While rastering you can adjust the power by pushing this button on using the arrow keys
- Speed: While rastering you can adjust the speed by pushing this button on using the arrow keys
Properties
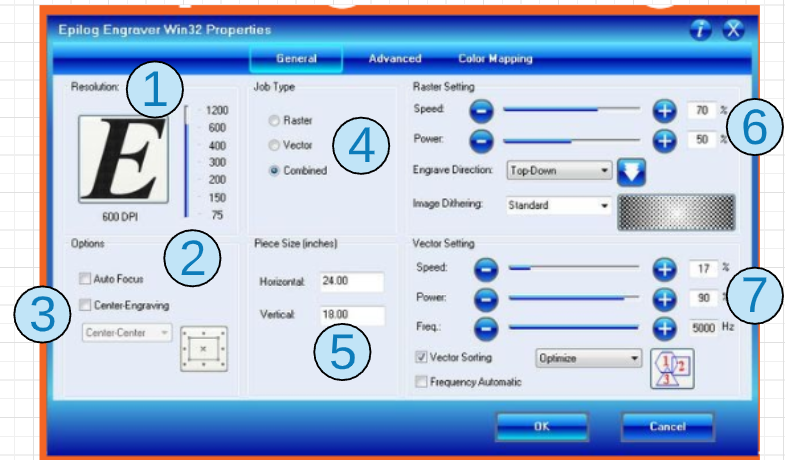
The other way for the user to interact with the laser cutter is by setting up the laser properties for a cut.
- Resolution:The print resolution can set from 75 to 1200 Dots per inch(DPI).the higher the DPI the more time it takes for laser cutter to complete the job.
- Auto Focus:In the Makerspace we use a manual focus instead of Auto Focus. Please, NEVER check the box, it will make the bed crash into the laser head
- Centre Engraving: it allows you to define the centre of the job.
- Job type
- Raster:Used for engraving material.Vector lines that should be engraved should be set to 0.006” (0.152 mm) or greater line thickness.
- Vector: Select when running cuts only. Vector lines that should be cut have to be set to 0.001” (0.0254 mm) or else it won’t recognized as cut.
- Combined: Select when running both cutting and engraving.
- Piece size: Enter the size of the document size of the job.
- Raster Settings:
- Speed: Determines the travel speed of the laser.It can be increased increments of 1%.The lower the speed,the deeper the cut.Each materials have their own specific value and can be in “Suggested Material settings” which islocated next to the laser cutters in Makerspace.
- Power: Determines the amount of laser energy that is delivered to the piece being cut/engraved and is adjustable in 1% increments.Each materials have their own specific value and can be in “Suggested Material settings” which is located next to the laser cutters in Makerspace.
- Vector Settings:
- Speed: Determines the travel speed of the laser.It can be increased increments of 1%.The lower the speed,the deeper the cut.Each materials have their own specific value and can be in “Suggested Material settings” which is located next to the laser cutters in Makerspace.
- Power: Determines the amount of laser energy that is delivered to the piece being cut/engraved and is adjustable in 1% increments.Each materials have their own specific value and can be in “Suggested Material settings” which is located next to the laser cutters in Makerspace.
- Frequency: Determines the number of laser pulses per inch of cut.Lower the frequency,the less heat being applied to the material. The frequency can range between 1 to 5000..Each materials have their own specific value and can be in “Suggested Material settings” which is located next to the laser cutters in Makerspace.

